What Color Should I Paint my Walls?

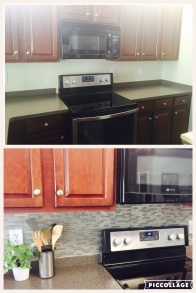
The first time we walked through our new home as potential buyers, our real estate agent said very plainly “…well, I can see why they don’t have any offers.”  Moving from room to room was like being transported back to the early 90’s…yellowy beiges and dark reds in terrible color combinations were everywhere.

What I saw was potential.  I am admittedly a ‘beach chic’ girl and I could envisage the walls in a light grey with white trim and our subtle beach themed décor highlighting the homes pretty structure (my husband on the other hand was siding with the agent).

I am not easily deterred and the day after closing, I had my sleeves rolled up and my paint brush (Purdy!) in hand.  The color I settled on was Lattice by Sherwin Williams.

dining room

family room

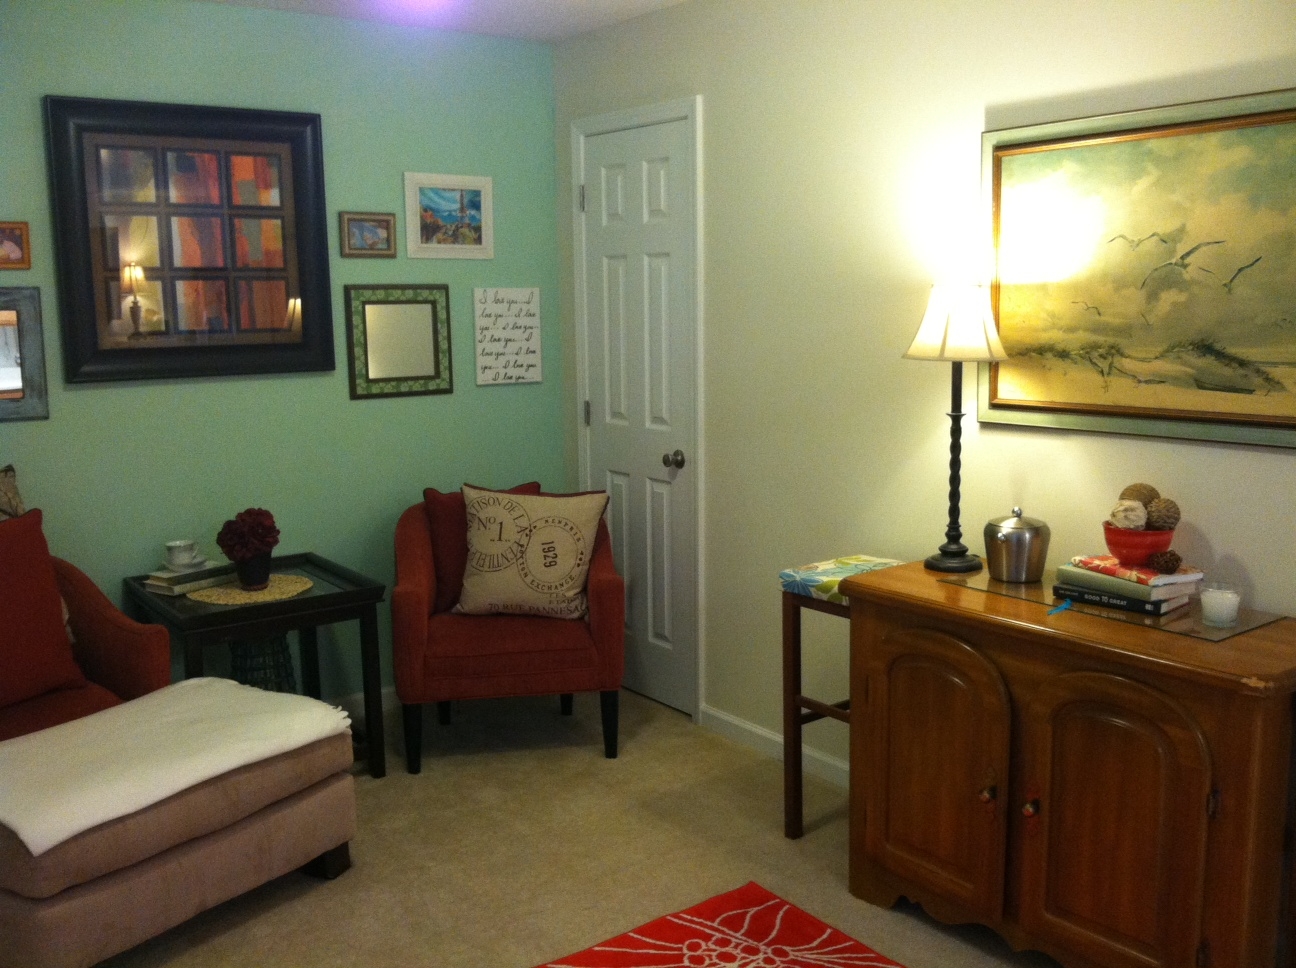
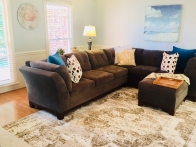
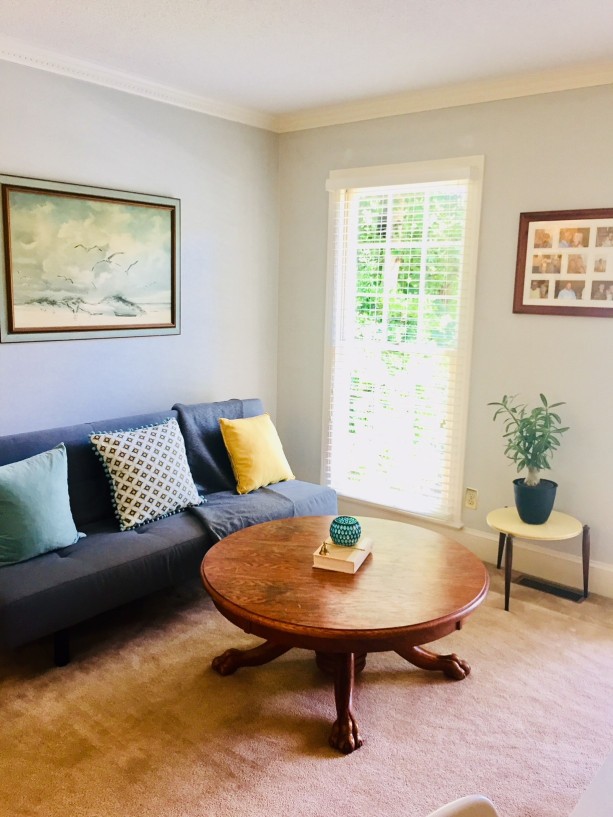
Lattice is like a chameleon.  In the full sun it looks pale and light with a hint of grey.  In the evening it seems to transform to a subtle shade of blue.  Whatever your design style might be – from ‘beach chic’ like me to contemporary, to cottage – Lattice takes on the hue of whatever surrounds it.  It’s the perfect backdrop for a subdued neutral scheme or the framework to make your bright colors pop. From the minute I put it on the walls, I was hooked!  I started with the family room above (after immediately removing those valences) and painted the whole first floor of the house.

new living room2


sitting room

new dining room

In a later post, I’ll dive into how I transformed this dining room from the scene of a horror film (scary red!) to the pretty, bright, inviting room it is now.  Thanks for reading!

Smart Tiles..Before and After Makeover

Last weekend I decided it was time to revamp my kitchen and I wanted to start by doing a tile back splash.  Neither my husband or I are very “handy,” and by that I mean our tool box is not a box at all but rather a small duffel bag. The thought of grout and a wet saw was a bit overwhelming.  I had almost given up until I came across these Smart Tiles at Home Depot.  I will be honest…at between $6.97 and around $10.00 for a 9.7 x 10.95 in. wall tile they are not much cheaper than the real thing.  What they do offer, however, is a quick and easy makeover with little to no mess and I was super impressed by the results.

FullSizeRender (16).jpg

This was our starting point.  I read some tutorials and hit up YouTube for installation recommendations and all suggested wiping off the wall with a degreaser or all-in-one cleaner prior to placing the wall tiles.  Other than that, all we needed was a straight edge and a box cutter.

FullSizeRender (14).jpg

The sheets or wall tiles are peel and stick so getting them up on the wall was the easy part.  The challenge was making sure that they were lined up correctly.  If you take this project on this Spring make sure to do your measurements!

All together I had the tiles in place and the outlet covers back on in about 3.5 hours.  Here is the finshed product!

FullSizeRender (10).jpg

Although to me the tiles look pretty great on their own, I added a line of white caulking between the Smart Tiles and the counter tops to give it a more realistic feel.  Total cost was about $120 and the kitchen looks like a totally new space.  Clean up took just a few minutes…love it!

FullSizeRender (8)


Creating a Dining Room Space…Apartment DIY

Reclaiming Your Castle

Reclaiming Your Castle

Last year my husband and I rented out our home and decided to rent an apartment closer to work and to my children’s school.  The location is perfect but the apartment is a bit older and very cookie cutter as apartments go.  Since we’re limited to what we can do on the inside I’ve turned my attention to our furnishings  – lighting up the space and making it feel more like a home.

This weekend’s project:  creating a dining room space.

Reclaiming Your Castle

Reclaiming Your Castle

This is where we started.  I’m big on repurposing so we picked up this lovely dining room set (I say that sarcastically) off of Craigslist for $70.  It came with 6 chairs, a buffet and hutch so the price wasn’t bad.

The major issue with repainting this set was the fact that is was covered in a lacquer coating.  Since we have no outdoor space, sanding or spray painting wasn’t an option which lead me to our local Home Depot to ask for a little advise.

Reclaiming Your Castle

Reclaiming Your Castle

They directed  me towards Kilz Original Oil Based Primer.  It smells like nail polish remover but wow, this stuff will cover just about anything.  It recommends two coats but I found that one was more than enough.  I allowed the primer to dry for about 30 minutes and then applied two coats of white semi-gloss oil-based paint.

Reclaiming Your Castle

Reclaiming Your Castle

I anchored the space with a throw rug (IKEA; $19.99) and created a wide runner with a curtain panel I picked up at our local thrift store, still in the box from Target ($9.99 / originally sold for $24.99).  While I was there I grabbed a set of 8 stoneware mugs ($0.49 a piece) great for juice or coffee in the morning and 4 matching pillows to use as cushions ($1.00 a piece).

Reclaiming Your Castle

Reclaiming Your Castle

Reclaiming Your Castle

Reclaiming Your Castle

I love fresh flowers in the Spring but keeping those on the table can get a little costly.  Baby’s Breath is a great alternative…it’s cheap, lasts forever, and the wispy white flowers are perfect for the season.

Reclaiming Your Castle

Reclaiming Your Castle

Our apartment does have a separate dining room but it’s directly off the front door and has no windows…who wants to eat there!  I split off the buffet table that came with our dining set to be used as an entryway table and it’s also destined for a new coat of paint.

Reclaiming Your Castle

Reclaiming Your Castle

5 Steps to Create a Cupcake Paper Wreath…

Reclaiming Your Castle

Reclaiming Your Castle

In the previous post on the Crate&Barrel inspired candlesticks I mentioned that I picked up a pack of cupcake papers…and here’s why!  I’ve been seeing these wreaths all over Pinterest and decided it was about time to give it a try.

Here’s what you’ll need:

1 – 12′ foam wreath

1- pack of push pins

1- pack of cupcake papers (100 count)

1- (optional) monogram letter

1- (optional) bushel of artificial Spring flowers

1- ribbon or wire for hanging

Reclaiming Your Castle

Reclaiming Your Castle

(my original plan was to add flowers to the wreath which I still think would be a great idea; in this case the push pins were not long enough to attach the flowers securely.  If you decide to add flowers, get sturdy pins!)

#1.  Flip Your Cupcake Papers Inside Out

Reclaiming Your Castle

Reclaiming Your Castle

#2.  Attach A Single Layer of Cupcake Papers to the Front of the Wreath

Reclaiming Your Castle

Reclaiming Your Castle

#3.  Attach a Single Layer to the Top and Inside Area of the Wreath

Reclaiming Your Castle

Reclaiming Your Castle

#4.  When all Layers Are Complete, Fold Individual Cupcake Papers in Half and Secure to the Wreath to Fill Any Gaps

Reclaiming Your Castle

Reclaiming Your Castle

#5.  Use Several Pins to Secure Monogrammed Letter to the Underside of Wreath

(Michael’s sells these for $1.99)

Reclaiming Your Castle

Reclaiming Your Castle

The Evolution of a Home Office Space…

Reclaiming Your Castle

Reclaiming Your Castle

We have a beautiful little sun room in our apartment; the idea was to fill it with my comfy slipper chair and use it for reading but yeah, that never happened.  With two kids, finding quiet time to read usually happens after 10PM and by that time I’m already in bed.

So, my husband has been asking me to make that space into a little home office and yesterday I finally gave in.  Besides, it gave me a place to put my new candlesticks!

Here’s the evolution of that space…and I guess the point is, rethink the use of space in your home.  If you have a neglected corner, turn it into a home office, or maybe add a bookshelf or a reading nook (if you’ll use it).  If you get to this post early enough maybe you can make it your Sunday project today!

Reclaiming Your Castle

Reclaiming Your Castle

Reclaiming Your Castle

Reclaiming Your Castle

Reclaiming Your Castle

Reclaiming Your Castle

Reclaiming Your Castle

Reclaiming Your Castle

Easy Weekend DIY Chalkboard…

Reclaiming Your Castle

Reclaiming Your Castle

This was a busy weekend!  Saturday I had a bridal shower in the afternoon and my friend’s birthday party in the evening but Sunday was DIY day!  I posted the buffet style serving dishes yesterday that I turned into a Spring centerpiece for our table, but I also decided to try out some chalkboard paint and repurpose a frame I picked up at Goodwill.

I neglected to take a picture of the original frame but once I had it pulled apart I started painting. 

Reclaiming Your Castle

Reclaiming Your Castle

I used Krylon for both the frame and the chalkboard; firstly because they were on sale and secondly only Krylon had the exact color of obnoxious pink that my daughter was insisting on. Start by cleaning the glass with alcohol.  Allow to dry and spray on one coat of the chalk board paint.  Let that dry for about 15 minutes and spray on a second coat.  I stopped here at 2 coats but I think spraying on a third would be even better.  Remember that there’s glass underneath so the sharp edge of a piece of chalk could scrape the paint off. 

Reclaiming Your Castle

Reclaiming Your Castle

I thought spray painting the frame would be the easy part but I was wrong…for one reason.  If the frame is finished with a wood gloss remember to go over it lightly with sand paper to prime the surface for paint.  I used like 5 coats but finally we got here.

Reclaiming Your Castle

Reclaiming Your Castle

Allow the frame to dry and insert the painted glass back into the frame.  Technically you are supposed to allow the chalkboard paint to set for 24 hours but the waiting was unbearable!!!

Reclaiming Your Castle

Reclaiming Your Castle

I will definitely need that third coat of paint…but I suppose it can wait until next weekend : )

Photo Gallery Wall Part 2…

Reclaiming Your Castle

Reclaiming Your Castle

Ever since I blogged about the photo gallery wall last week I’ve been wanting to give it shot using one of the templates from that post.  My journey finally began yesterday with a cup of coffee and a long time deliberating over what template to use and where to put it.  After like 4 cups of coffee I finally decided on the bedroom!

Reclaiming Your Castle

Reclaiming Your Castle

Reclaiming Your Castle

Reclaiming Your Castle

The template I used required 2 8×10’s and 6 5×7’s.  It’s not essential that you have matching frames for the photo gallery wall but every time I’ve tried using ones I have lying around the house I never achieve the same look…so I headed over to Walmart.  They have basic matted frames – $3 for the 5×7’s and $5 for the 8×10’s – so for a total of $28 I got all the frames I needed to pull it together.  And this is the result!

Reclaiming Your Castle

Reclaiming Your Castle

Reclaiming Your Castle

Reclaiming Your Castle

Yay!  It’s amazing what a difference the photo gallery wall made in this room; I love it!  Here are a few tips that helped me finally get this look right:

#1.  Use a Template

Part of the reason a photo gallery wall works so well is the symmetry.  A template will help keep your photos organized visually and allows for better planning before you put them up on the wall.  Try laying the photos out together to work out spacing and decide what looks best where.

Reclaiming Your Castle

Reclaiming Your Castle

#2.  Use Matching or Similar Frames

This really depends on the look you’re trying to achieve.  You can put together an eclectic gallery wall with lots of different frame sizes and colors, but if your going for a traditional look  it’s worth the investment of $3-$5 on matching frames from your local Walmart.

#3.  Add Some Visual Interest

I used the “Eye Chart” from Thursday’s post in one of the 8×10 frames to break up the family photos (love it!) You could use any framed quote, a scenery pic from a favorite vacation, framed scrap book paper or artwork…something to spice things up!

Reclaiming Your Castle

Reclaiming Your Castle

#4.  Line Up the Bottom of Your Frames and Not Just the Top…

I never considered the difference this would make before but it goes back to symmetry.  Line up the bottom of the frames to square off your look.  Once I had the frames up on the wall I realized there would be a gap between the 8×10 frames in the center so I filled that with a “family” decal I had from a previous project.  It helped add another layer to the gallery wall and kept the look polished with even lines.

Reclaiming Your Casle

So that’s it!

I hope this post encourages you to give the photo gallery wall a shot…it was a lot of fun and totally worth the time and investment!