What Color Should I Paint my Walls?

The first time we walked through our new home as potential buyers, our real estate agent said very plainly “…well, I can see why they don’t have any offers.”  Moving from room to room was like being transported back to the early 90’s…yellowy beiges and dark reds in terrible color combinations were everywhere.

What I saw was potential.  I am admittedly a ‘beach chic’ girl and I could envisage the walls in a light grey with white trim and our subtle beach themed décor highlighting the homes pretty structure (my husband on the other hand was siding with the agent).

I am not easily deterred and the day after closing, I had my sleeves rolled up and my paint brush (Purdy!) in hand.  The color I settled on was Lattice by Sherwin Williams.

dining room

family room

Lattice is like a chameleon.  In the full sun it looks pale and light with a hint of grey.  In the evening it seems to transform to a subtle shade of blue.  Whatever your design style might be – from ‘beach chic’ like me to contemporary, to cottage – Lattice takes on the hue of whatever surrounds it.  It’s the perfect backdrop for a subdued neutral scheme or the framework to make your bright colors pop. From the minute I put it on the walls, I was hooked!  I started with the family room above (after immediately removing those valences) and painted the whole first floor of the house.

new living room2


sitting room

new dining room

In a later post, I’ll dive into how I transformed this dining room from the scene of a horror film (scary red!) to the pretty, bright, inviting room it is now.  Thanks for reading!

Baked Garlic Butter Crab Legs

13147334_10153799583953347_4730338715562541996_oWhen I was 21 my best friend and I decided we would take a weekend trip to Charleston, SC on a whim.  We hopped in her VW bug, made the 3 hour trek to Folly Beach and spent all afternoon laying in the sun.  Just before dark we walked to a beach side bar, drank cold beer and ate crabs legs on a sand covered patio listening to the waves and Jimmy Buffet.  What’s better than that? Nothing.  And that is why I love crab legs…

Just because I love them doesn’t mean I would be so bold as to try and cook them at home.  Do you steam them? Do you boil them?  I’m from upstate NY…I have no idea. My husband, however, is from Charleston (no, we didn’t meet on that trip, but that would have been a nice story!) and guess what, it’s easy.  Crab legs are delicious and fast; prepared in the oven with a generous amount of butter, garlic and lemon juice.

DSC00056 (1)

BAKED GARLIC BUTTER CRAB LEGS

Ingredients:

  • 2 lbs crab legs
  • 1 cup of butter
  • 5 garlic cloves, minced
  • 1 lemon, juiced
  • 12 lime, juiced
  • salt to taste
  • 1 tsp dried parsley

Directions:

Preheat your oven to 375 degrees.  While it’s heating, melt your butter in a small saucepan over a medium low setting.  Add the minced garlic, lemon and lime juice and dried parsley.  Turn heat to low and simmer until the garlic is fragrant.  Set aside.

Get those crab legs into a large baking dish (I used my grandmother’s roaster) and brush liberally with your delicious garlic butter mixture.

Set your timer for 25 – 30 minutes and pop those babies in!  Baste the crab legs every 5 minutes or so with the juices from the pan.

Take them out, let them cool and then get to crackin.’


We served these on Mother’s Day with a low country boil and biscuits; so good!

DSC00053


3 Simple and Delicious Cream Sauces

There are very few things that are as versatile as a good cream sauce…and every good cream sauce starts with these two things:  Cream and Butter.  I know, I know…it’s so unhealthy!  After you start eating however, I doubt that will be much of a concern.  Just don’t eat the leftovers for breakfast and you should be fine ; )

A few days ago I posted a recipe for a sun-dried tomato cream sauce with shrimp and crushed red pepper flakes….so good.  If you’re interested in that one check out my recent post.

Let’s start with just a basic:

Alfredo Cream Sauce

 Ingredients:

  • 1/4 cup butter
  • 1 cup heavy cream
  • 1 clove garlic, crushed
  • 1 1/2 cups Parmesan cheese
  • 1/4 cup chopped fresh parsley
  • 1/4 tsp salt
  • freshly ground black pepper to taste

Directions:

  1. Melt butter in a heavy saucepan over medium low heat.
  2. Add cream and simmer for 3-5 minutes
  3. Add garlic, parmesan cheese and whisk.
  4. Stir in parsley, salt and pepper.

Now let’s jazz it up and try out some variations…this one courtesy of sir Tyler Florence.

Mushroom Cream Sauce

 Ingredients:

  • 2 tablespoons unsalted butter
  • 2 garlic cloves, finely minced
  • 5 sage leaves, chopped
  • Salt and pepper, to taste
  • 6 ounces Portobello mushrooms, sliced
  • 1 cup heavy cream
  • 1/2 leek, roughly chopped

Following the picture link above for instructions!

Tomato Cream Sauce

 Ingredients:

  • 2 Tablespoons Olive Oil
  • 2 Tablespoons Butter
  • 1 whole Medium Onion, Finely Diced
  • 4 cloves Garlic, Minced
  • 2 cans (15 Oz. Size) Tomato Sauce Or Marinara Sauce
  • Salt And Pepper, to taste
  • Dash Of Sugar (more To Taste)
  • 1 cup Heavy Cream
  • Grated Parmesan Or Romano Cheese, To Taste
  • Fresh Basil, Chopped
  • 1-1/2 pound Fettuccine

Following the picture link above for instructions!

Throw some protein and pasta into any of these sauces, serve with crusty bread and a side salad and you’ve got an amazing meal.

Enjoy! xoxo

How to Create an Indoor Flowering Cactus Garden

Obaz

Spring is all about flowers but keeping fresh flowers in the house all the time can get expensive!  Enter the indoor desert oasis of the mini cactus garden.  It’s adorable, right?  The textures and colors make this perfect for adding visual interest to the flat lines of your kitchen or bathroom and it’s easy to do.

A Beautiful Mess

via HGTV

When to Start: Spring

At Its Best: Early Summer

Time to Complete: 1 1/2 hours

Materials Needed:

  • shallow planting bowl
  • pebbles
  • cacti soil
  • sand
  • newspaper
  • spoon
  • heavy-duty gloves
  • watering can
  • miniature cacti; this selection includes: silver torch cactus, Mammillaria, elephant-ear pricklypear and Rebutia

Before You Start

Cacti famously survive on little water, but if you want them to grow and flower they should actually be watered regularly during the growing season. Giving them a thorough watering before planting will help the roots make good contact with the new soil, and they should grow very well.

HGTV

Aid Drainage

All cacti hate to sit in water, so make sure it will run freely through the growing medium, and out of the bottom of the pot. The container should have lots of drainage holes, covered by a layer of pebbles, to prevent the soil from clogging up the holes.

HGTV

Set Out the Plants

Put on your protective gloves and start arranging your plants. If you have chosen the position for each of your cacti before you start, planting will be easier and you are more likely to end up with a good overall effect. It makes sense to put smaller ones at the front and larger ones at the back, but also consider planting those with different habits, textures and flower color next to each other.

HGTV

Planting Tips

Wrap a folded strip of newspaper around the top of the plant. This will help you slide it out of its pot and maneuver it into the larger planter without getting spines or fine hairs in your fingers. It also protects the plant.

HGTV

Fill in the Gaps

Once the plants are in position, use a spoon to carefully fill the gaps between them with a cacti soil. Add small amounts of soil at a time and keep firming it down with the back of a spoon to ensure that there are no air holes left around the plant roots.

HGTV

Brush Off Soil

No matter how careful you are, some soil will inevitably get caught in the cactus spines and hairs. Use a soft brush to remove it and to keep the plants looking clean and neat.

HGTV

Water the Plants

Water all the plants in well. In summer, they can be watered whenever the surface of the soil dries out. In winter, they should be left dry; start watering again sparingly when you see signs of growth in spring.

HGTV

Apply a Sand Mulch

Use the spoon to spread fine sand around the surface of the planter. This helps water quickly drain away from the surface, preventing rot, and gives the planter an authentic desertlike appearance. Set your arrangement in a bright, sunny position.

HGTV

Top Tip: Watering Crowded Pots

Cacti are often sold when the plants are almost overflowing the sides of their pots, making it tricky to water them properly before planting. Sit these in a container of water until the root ball is damp.

HGTV

Zesty Shrimp and Sun-Dried Tomatoes in Cream Sauce

I enjoy cooking with shrimp on the weeknights.  There are so many things you can do with Shrimp and the recipes are fast and delicious.  This is one of my favorites made with a light lemon cream sauce, garlic and sun-dried tomatoes.

FullSizeRender (17)

Ingredients:

  • 1 lb. of precooked shrimp
  • 5 oz sun-dried tomatoes in olive oil
  • salt
  • 1/2 cup mushrooms (optional)
  • 1/2 teaspoon paprika
  • 4-5 garlic cloves, minced
  • 2 teaspoons lemon juice
  • 1 1/2 cup half and half
  • 2 teaspoon dried basil (reserve 1 tsp to garnish)
  • 1/2 teaspoon crushed red pepper
  • 1 1/2 cup Parmesan cheese
  • 8 oz fettuccine pasta

Instructions:

  1. In a large skillet, saute minced garlic, sun-dried tomatoes and mushrooms in 3-4 tablespoons of oil (use the oil from the sun-dried tomatoes jar!) for 2-3 minutes until mushrooms soften.
  2. Add shrimp, paprika, crushed red pepper and 1 tsp basil. Cook on medium heat for 2 additional minutes.
  3. Slowly pour half and half into the skillet. Add lemon juice. Bring to boil; reduce to simmer.
  4. Sprinkle in Parmesan cheese and stir frequently until melted.
  5. Remove the sauce from heat and add cooked pasta directly to the skillet until you are satisfied with the ratio of sauce to pasta.
  6. Serve pasta garnished with a sprinkle of Parmesan, basil and salt to taste.

Tip:  Mushrooms are optional.

Tip # 2.  Taste the sauce while your cooking!  Want a little more zest…add another dash of lemon juice.  Cheesier…add a little more Parmesan.  Hotter…a few more sprinkles of crushed red pepper.  It’s impossible to learn to work with ingredients if you don’t experiment a little.


My husband is trying to cut carbs so we served his over steamed broccoli.  Another tip…it’s not as good as the pasta 😉

10 Must Try Spring Things!

Who doesn’t love Spring?  The days are longer, the colors are brighter…you can finally turn off the heat and open the windows…it’s great.

Here are a few of my favorite ways to bring Spring in doors and pretty yourself…and your house up in the process.

#1. Spring Candles

I burn candles all winter long.  I think most of us do.  There’s something about the flame and the warm glow that makes the house feel comfy.  The same can be true for Spring… and Bath & Body Works has incredible Spring scents.  Honeysuckle from the 2015 line was one of my favorites!

#2. Wildflowers

I love Wildflowers; so much more so than standard tulips and flower store arrangements.  If you have access to a local nursery, pick some up and bring them inside!  Wildflowers are so simple and look effortlessly beautiful in just a cup of water or a simple vase.  Try leaving a few small collections of them around the house in the bedroom and bathroom areas.

#3. Spring Artwork

I have a few standard pieces of art that I leave up in the house all the time.  A new painting or watercolor, however can make a whole room feel brighter.  Try switching out your landscapes for a burst of color like in the piece below.  Esty is a great source for some original artwork…or maybe get crafty and paint your own!

#4. Spring Decor

If you’ve been on Pinterest lately you’ve no doubt seen blogs and websites offering free printables.  Have you given one a try?  You should.  You can pair the printable below with a super cheap clip board frame from Micheal’s and all your friends will compliment you on your crafting abilities.   Particularly if you followed the advise in #3 and painted your own artwork!  Don’t go overboard though…you’ll be decorating their houses next 🙂


#5.  Spring Pillows

Just like artwork, there’s nothing that changes the feel of a room like a few new throw pillows.  If you’ve found a pillow you love, don’t take it off the couch for the season; look for pillow covers online or at your closest IKEA.  New pillows bring color into your space without breaking the budget.

Here’s a super affordable one from Target.

#6.  Spring Photography

Use that iPhone for more than selfies…or another picture of your kids!  I cannot judge, I have thousands of both.  Here’s the thing though, your smart phone camera has some amazing capabilities and there are apps out there that you will make your photos look like works of art.  Take them to your local Walgreens and have them made into canvases rather than buying someone elses work.

#7.  Seasonal Cooking

Cooking with seasonal fruits and vegetables is just another way to feel like you’re bringing the outside indoors.  Citrus fruits and bright flavors pair really well with white wine and dinner on the back porch.  This Creamy Lemon Chicken Picatta would do the trick!

#8. Spring Lip Colors

Who said decorating is just for the house!  Spring color is beautiful everywhere…especially on you.  Try switching out the darker lip stains that were popular this winter for bright pastels in pretty peaches and pinks.  I stumbled on this website for the best of the drug store brands and it’s addictive.  Enjoy reading through her helpful makeup posts.

#9.  Spring Skirts

Update your wardrobe this Spring with a few floral skirts.  They do just as well in the office as they do around town on the weekends.  I love a floral skirt with a fitted white tee and strappy sandals.  Really feminine and flirty.

#10.  Spring Cleaning

I saved this one for last because no one likes doing it…but it feels so good when it’s done!  I love this list because you can follow it in steps instead of trying to clear out everything in a weekend…and it’s not only space saving but money saving as well.  Great list.

Thanks for reading along…hope this was helpful to you this Spring Season!

Homemade Coffee Creamer…Make Yours At Home!

Around My Family Table

I love coffee for many reasons – besides the necessary dose of caffeine that I can’t function without in the morning, the flavored creamers bring a smile to my face. Chocolate Almond one morning…Hazelnut the next – but who can afford to buy all of those varieties at once? Hmmmm. Why not make them at home!

via Mrs Happy Homemaker

Start With This Base:

  • 14oz Sweetened Condensed Milk
  • 1 3/4 Cup Milk or Cream (whole, lowfat, skim, almond, soy, heavy cream, half & half etc – whatever your preference, however the more fat, the more creaminess)

…and, here we go!

French Vanilla Creamer

  • 2 teaspoons vanilla extract OR vanilla coffee syrup

Vanilla Bean Coffee Creamer

  • 2 teaspoons vanilla bean paste

Chocolate

  • 2-3 tablespoons chocolate syrup
  • (1 tsp vanilla extract, optional)
Coffee Style 10
Coffee Style 10

Chocolate Almond

  • 1 tablespoon cocoa powder
  • 1 teaspoon almond extract

Strudel

  • 1 tablespoon cinnamon
  • 1 teaspoon vanilla extract
  • 1 teaspoon almond extract

Vanilla Caramel

  • 2 tablespoons caramel ice cream topping
  • 2 teaspoons vanilla extract

Chocolate Raspberry

  • 2 teaspoons cocoa powder
  • 2 tablespoons raspberry syrup

Irish Cream

  • 2 tablespoons chocolate syrup
  • 1 teaspoon instant coffee
  • 1-2 teaspoons vanilla extract
  • 1 teaspoon almond extract
2 Eat 2 Drink
2 Eat 2 Drink

Coconut

  • 2 teaspoons coconut extract

Samoa (like the Girl Scout Cookies)

  • 2 teaspoons coconut extract (or sub coconut milk or cream of coconut, heated & strained, for the milk/cream)
  • 2 tablespoons chocolate syrup
  • 2 tablespoons caramel ice cream topping

Peppermint Patty

  • 2 tablespoons chocolate syrup
  • 1 teaspoon peppermint extract

Cinnamon Vanilla

  • 2 teaspoons cinnamon
  • 2 teaspoons vanilla extract

Pumpkin Spice

  • 3 tablespoons pureed pumpkin
  • 1 teaspoon pumpkin pie spice
  • 4 tablespoons maple syrup
  • 1 teaspoon vanilla extract

Honey Vanilla

  • 1/4 cup honey
  • 2 teaspoons vanilla extract

Almond Joy

  • 1-2 teaspoons coconut extract (or sub coconut milk or cream of coconut if you heat it first, strained, in place of the milk & extract)
  • 1 teaspoon almond extract
  • 2 tablespoons chocolate syrup
Delia Creates
Delia Creates

Sweet Cream

  • Use 1 3/4 cups of heavy cream instead of the milk in the base recipe
  • 2 teaspoons vanilla extract OR the inside of a vanilla bean, scraped
  • 1 teaspoon almond extract

Chocolate Orange

  • 2 tablespoons chocolate syrup
  • 1-2 teaspoons orange extract

Hazelnut

  • 2 teaspoons hazelnut extract

Chocolate Hazelnut

  • 2 tablespoons chocolate syrup
  • 2 teaspoons hazelnut extract

Cinnamon Cake

  • 2 teaspoons cinnamon
  • 2 teaspoons vanilla extract

Salted Caramel

  • 2-3 tablespoons caramel ice cream topping
  • 1/2 teaspoon salt

Eggnog

  • replace milk in base recipe with equal amount of heavy cream
  • 1 teaspoons vanilla extract
  • 2 teaspoons rum extract
  • 1 teaspoon ground nutmeg

For those of you who want or need a sugar-free option. You can make your own sweetened condensed milk with the sugar substitute of your choice. Now, you can make your own sugar-free flavored creamer!

Directions & Tips:

In all these recipes, anything that has a dry or thick ingredient (like cinnamon, honey, etc..) should be heated up with a small amount of your milk/cream from the base recipe so it can dissolve properly.You don’t want grainy creamer! Then, add the rest of the milk/cream along with the sweetened condensed milk.

If you want really creamy creamer, use heavy cream instead of milk in your base recipe.

Stick a piece of tape on your mason jar lid with the expiration date from the milk you used as a guideline to when the creamer should be used by.

5 Ways to Make the Most of Your Weekend…

Food for thought heading into your weekend!

RECLAIMING YOUR CASTLE

Ocean Island Living Ocean Island Living

Saturday and Sunday are the fastest two days of the week.  Why?  Because instead of getting up early and following a routine like we do the rest of the week, these days start later and often include several hours watching America’s Next Top Model reruns while folding laundry.  If your still young enough to go out at night than most likely your weekends consist of too much alcohol, Waffle House at 2AM and breakfast at noon.  While there’s nothing wrong with that on occasion, falling into a routine of mundane weekends leaves you feeling like you’ve wasted precious time and uninspired when Monday rolls around again.

Here are 5  ways to revamp your weekends and utilize your two days of freedom.

#1.  Plan a Day Trip or Weekend Get Away

If you live within a few hours of the beach, the mountains or even a state park plan a short trip.  Leave Friday night…

View original post 378 more words

Smart Tiles..Before and After Makeover

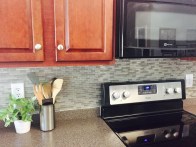
Last weekend I decided it was time to revamp my kitchen and I wanted to start by doing a tile back splash.  Neither my husband or I are very “handy,” and by that I mean our tool box is not a box at all but rather a small duffel bag. The thought of grout and a wet saw was a bit overwhelming.  I had almost given up until I came across these Smart Tiles at Home Depot.  I will be honest…at between $6.97 and around $10.00 for a 9.7 x 10.95 in. wall tile they are not much cheaper than the real thing.  What they do offer, however, is a quick and easy makeover with little to no mess and I was super impressed by the results.

FullSizeRender (16).jpg

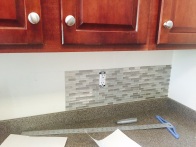
This was our starting point.  I read some tutorials and hit up YouTube for installation recommendations and all suggested wiping off the wall with a degreaser or all-in-one cleaner prior to placing the wall tiles.  Other than that, all we needed was a straight edge and a box cutter.

FullSizeRender (14).jpg

The sheets or wall tiles are peel and stick so getting them up on the wall was the easy part.  The challenge was making sure that they were lined up correctly.  If you take this project on this Spring make sure to do your measurements!

All together I had the tiles in place and the outlet covers back on in about 3.5 hours.  Here is the finshed product!

FullSizeRender (10).jpg

Although to me the tiles look pretty great on their own, I added a line of white caulking between the Smart Tiles and the counter tops to give it a more realistic feel.  Total cost was about $120 and the kitchen looks like a totally new space.  Clean up took just a few minutes…love it!

FullSizeRender (8)


Basil Pesto Turkey Meatballs

FullSizeRender

I discovered a version of these meatballs last year when my husband and I made an attempt to eat nothing but a low carb, paleo based diet.  It was a great idea in theory but neither our budget nor our children were capable of supporting that life choice 🙂

So, this recipe morphed into what it is today…a delicious weeknight staple that is still relatively healthy and packs a lot of flavor with the addition of creamy basil pesto.  (Here’s me posing with the meatballs…and wishing I wasn’t still in my work clothes making dinner)!

Blog

Ingredients

2 lbs ground turkey 
1 cup Panko bread crumbs
1 7-10 oz container basil pesto
1/3 cup grated Parmesan cheese
1/2 teaspoon salt
1/4 teaspoon black pepper
2 eggs
1 jar spaghetti sauce (2 if your family likes a lot of sauce…which mine do)

Directions

  • Heat oven to 350°F.
  • In large bowl, mix all ingredients (minus the spaghetti sauce) until well combined.
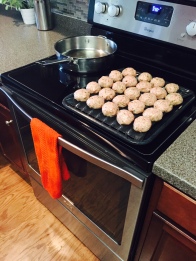
  • Shape mixture into balls; place on rack or cookie sheet coated lightly with cooking spray.

FullSizeRender(2)

  • Bake 25-30 minutes or until thermometer inserted into the center of the meatballs reads 165°F.
  • Begin heating spaghetti sauce in a separate sauce pan. Spoon the meatballs into the sauce, cover, set to low and allow to simmer for 5-7 minutes.

FullSizeRender(1)

They look good, right!  That’s it.  Serve them over pasta noodles or stuff them into a toasted roll and top with provolone cheese (one of my husband’s favorite ways to eat them).  If you have any cheese sticks in the fridge, cut them up into bite sized pieces and stuff them into the meatballs before you put them in the oven to bake (mom trick).


Enjoy!