7 Fast and Fun 4th of July Day Desserts…

Gimme Some Oven

Gimme Some Oven

The 4th of the July is right around the corner and if you’re the one bringing desserts this year than this list might come in handy!  The holiday falls mid week so we’re looking for limited prep time with fabulous results-here are 7 desserts that fit the bill.

#1. 4th of July Rice Crispy Treats

Lil' Luna

Lil’ Luna

SUPPLIES:

– 6 cups Rice Krispies Cereal

– 1 package marshmallows

– 3 TB margarine or butter

– Food coloring (red and blue – preferably Betty Crocker Gel Food Colors)

INSTRUCTIONS:

1. Gather your supplies and divide the Rice Krispies and marshmallows in three for the three layers.

2. Microwave marshmallows –  stick them in for a few minutes or until they start to get big and almost touch the top of the microwave. Take them out, stir well and add the food coloring. Then add the 2 cups of Rice Krispies and stir well. Press into well greased 9×9. If you want yours to come out thicker use a 9×9 (8×8 would work as well).

3. Do this for all 3 layers starting with the blue, then white and then red. Pat down all layers really well using wax paper.

4. Let set for a bit, then cut, serve and enjoy!

#2. Flag Pretzels

Passion for Savings

Passion for Savings

Ingredients

  • 1 Bag Pretzel Rods
  • 24 oz. Almond Bark
  • 2 Tbsp. Shortening
  • Food Coloring
  • White Sprinkles
Instructions
  1. Melt the Almond Bark with 2 Tbsp. Shortening
  2. Dip the Pretzel Rods in White Almond Bark
  3. Divide remaining Almond Bark in half and add Red and Blue Food Coloring
  4. Dip ⅓ of the White Chocolate Pretzels back in Blue Chocolate
  5. Add White Sprinkles before drying
  6. Drizzle Red Chocolate over the remaining white section to create stripes

#3. Revolutionary Berries

Spoonful

Spoonful

What you’ll need

  • 12 ounces white chocolate chips
  • Strawberries
  • Blue sugar or edible glitter

How to make it

  1. Melt 12 ounces of white chocolate chips in a microwave according to the package directions (make sure the container and the berries are dry; even a little moisture will alter the texture of the candy).
  2. One at a time, dip strawberries into the chocolate and then into blue sugar or edible glitter.
  3. Set them to harden on waxed paper.
  4. Makes 35 to 45 decorated berries.

#4.  4th of July Cupcakes in a Jar

The Tomkat Studio

The Tomkat Studio

~ How to make 4th of July Cupcakes in a Jar ~

You’ll need…

Jars (I used 1/2 pint canning jars)

1 Vanilla cake mix (from a box or from scratch)

Frosting (from a can or homemade)

Instructions:

Prepare the batter of your favorite vanilla cake (from a box or from scratch).  Divide the batter as equally as possible  into three bowls.  Color one bowl of batter red, and one blue (using concentrated gel coloring).  The final bowl will remain uncolored.  Prepare 3- 9″ cake pans (round or square) by greasing the pan lightly (with butter or oil), and lining with parchment paper.  Fill pans with batter.   Bake cakes according to recipe instructions.

Once baked, cool cakes completely.  Remove cakes from pans, and level cakes as needed.  Then, use a 2″ round cookie cutter to cut out circles of cake.  Prepare a batch of frosting (I used my Cream Cheese Frosting) and fill a piping bag fitted with a large round or star tip.  Layer cake and frosting as shown above (blue cake, a little frosting, white cake, a little frosting, red cake, a nice swirl of frosting).  Top with festive sprinkles.

*Note- the cupcakes in a jar could also be make using cupcakes, cut in half, then used as directed above.

#5. Patriotic Fruit Pops

Sheek Shindigs

Sheek Shindigs

  • To make these, used watermelon, apples and blueberries.
  • To keep the apples from browning, lightly brush them with lime or lemon juice. I prefer limes for the flavor and that they seem less tart.
  • Cut watermelon and apple pieces to thickness of the cookie cutter, then place cookie cutter on top of slices and push straight down. Place one fruit inside of another and finish with a blueberry in the middle.
  • Push the straw through all three pieces of fruit to keep it everything in place. If you have trouble pushing a paper straw through the apple portion, use a plastic straw first to create a pathway and then replace with the paper straw. Popsicle sticks will work as well.

#6. 4th of July Marshmallow Pops

Wenderly

Wenderly

What you’ll Need:

1 bag of red candy melts
1 bag of blue candy melts
20 large marshmallows
20 red & white striped paper straws

What you’ll do:

1. Melt red & blue candy melts in separate bowls according to package instructions.
2. Insert a straw 3/4 deep into each marshmallow and take out again. This will leave the hole where the straw will go after dipping marshmallows.
3. Dip the side of the marshmallow with the hole into the melted blue candy coating. Hold marshmallow over bowl after dipping and tap your hand until excess candy coating has been tapped off of the marshmallow.
4. Place marshmallow with the dipped side up and insert straw into each hole. Let dry completely.
5. Once the blue coating is completely dry, hold the marshmallow by the sides (not the straw) and dip into the red melted candy coating. Tap hand to shake off excess candy coating.
6. Place  the marshmallow pop (straw side down) into a heavy glass to dry.

#7. Red, White and Blueberry Popsicles

Nourishista

Nourishista

Ingredients
2 c. fresh strawberries, washed and stems removed
2 c. fresh blueberries
1 1/4 c. low-fat vanilla yogurt
2  T. honey (do not feed honey products to children under 1 year of age)
Popsicle molds
8 popsicle sticks
 
Directions

1. Place strawberries in a bowl and add 1 T. honey.  Use an immersion blender or regular blender to puree.  You should taste the mixture.  If it does not seem sweet enough, you may want to add some more honey.  Some strawberries are sweeter than others.

2.  Place blueberries in a bowl and add 1 T. honey.  Use an immersion blender or regular blender to puree.  You should taste the mixture.  If it does not seem sweet enough, you may want to add some more honey.  Place the blueberry mixture in the refrigerator.

3.  Take your popsicle molds and using a spoon add enough strawberries to fill the mold 1/3rd full.  Try to make the layers as even as possible.  But don’t stress about it too much.  They don’t have to be perfect. (Tap the molds on the counter gently after each layer to help get rid of air bubbles.  I didn’t do this and there were air pockets in my popsicles. Also be sure to wear an apron when you tap the molds on the counter, or you will get the popsicle filling on your clothes.) Freeze you popsicles for 1 hour.   

4.  Now add the popsicle sticks.  Push them into the strawberry layer about 1/2 an inch.  You do not want to push the popsicle stick too far down or they will be sticking out.  Freeze popsicles for another hour.  Next add the yogurt and fill to 2/3rds full.  Let freeze for 2 hours.

5. Now add the blueberry layer and freeze for another 2 hours.  Run the molds under warm water to release. Your popsicles are ready to enjoy! 

10 Shrimp Recipes…Easy and Delicious Weeknight Meals

The Washington Post

The Washington Post

I really enjoy cooking with shrimp…they’re low in fat, high in protein, easy to cook and versatile.  My son eats them cold by the handful and my daughter thinks they’re chicken – anytime I can work them into dinner at my house everyone’s happy!  Here are 10 exciting recipes for all the shrimp lovers in your home…

#1.  Roasted Basil Butter Parmesan Shrimp

how sweet it is

how sweet it is

Ingredients:

6 tablespoons unsalted butter, at room temperature

3 tablespoons fresh chopped basil

2 pounds raw, peeled and deveined shrimp

1 1/4 teaspoon salt

1 teaspoon pepper

2 tablespoons olive oil

1/4 cup freshly grated parmesan

additional fresh basil and cilantro for sprinkling

Directions:

Preheat oven to 425 degrees F.

Combine butter, basil and 1/4 teaspoon salt together in a small bowl, mixing to combine. Place butter on a piece of plastic wrap, shaping it into a ball or a log and wrapping it up. Set in the fridge to harden.

Add shrimp to a large baking dish. Cover in salt, pepper and olive oil, tossing to coat. Roast for 10-12 minutes (or longer or shorter for the size of your shrimp, I actually roasted mine for 15 minutes because they were super jumbo. Just keep an eye on them and the minute they are pink, remove from the oven.) then remove and slice basil butter over top. Cover in parmesan and another sprinkling of herbs, then serve immediately.

#2.  Shrimp Tacos

Grocery Coupon Network

Grocery Coupon Network

Ingredients:

1/2 cup sour cream

3 tablespoons mayonnaise

3 tablespoons milk

1/2 teaspoon ground cumin

1 1/2 pounds large shrimp (peeled)

3 tablespoons butter, melted

2 cloves of garlic (minced)

4 limes (cut into quarters)

Kosher salt

8 6-inch corn tortillas

2 cups of shredded lettuce or cabbage

salsa

Directions

  1. Heat grill to medium-high. In a small bowl, whisk together the sour cream, mayonnaise, milk, and cumin. Set aside.
  2. Skewer the shrimp. (If using wood skewers, soak them in water for 10 minutes beforehand.) In a small bowl, combine the butter and garlic. Brush the shrimp with the garlic butter.
  3. Place the shrimp on grill with the limes. Cook for about 4 minutes on each side or until the limes are browned. If you prefer you can lightly salt to shrimp.
  4. Grill the tortillas (30 seconds on each side)
  5. Take the shrimp off the skewers and place inside the tortillas. Top with the cabbage, sour cream sauce, and salsa. Squeeze lime over everything and enjoy!

#3.  Jamaican Shrimp

relative taste

relative taste

Ingredients:

  • 3 quarts water
  • 1 teaspoon salt
  • 2 pounds uncooked shrimp, peeled and deveined
  • 1/3 cup olive oil
  • 1/4 cup white wine vinegar
  • 3 tablespoons lime juice
  • 1 jalapeno pepper, seeded and finely chopped
  • 4 teaspoons honey
  • 3 teaspoons Jamaican jerk seasoning
  • 1 medium mango, peeled and cubed
  • 1 small red onion, sliced and separated
  • 1 medium lime, quartered and sliced

Directions:

In a large saucepan, bring water and salt to a boil. Add shrimp and boil for 3 minutes or until shrimp turn pink, stirring occasionally. Drain and rinse with cold water. Transfer to a large resealable plastic bag.

In a bowl, whisk the oil, vinegar, lime juice, jalapeno, honey, and jerk seasoning. Pour 3/4 cup marinade over shrimp. Seal bag and turn to coat. Refrigerate for 1-2 hours. Refrigerate remaining marinade.

Just before serving, drain and discard marinade from shrimp. On a serving platter, layer the shrimp, mango, onion and lime. Drizzle with the remaining marinade.

#4.  Warm Summer Shrimp Salad

Food 52

Food 52

  • 2 pounds large shrimp (21/25 count), peeled and deveined, shells reserved
  • 2 tablespoons coarse salt
  • freshly ground white pepper
  • 4 cups water
  • 6 ears fresh sweet corn, kernels scraped (about 3 cups)
  • 1 tablespoon corn oil, preferably unrefined, or pure olive oil
  • 2-3 medium to large tomatoes, preferably heirloom, cored and chopped
  • 2 lemons (finely grated zest and juice of 1, and 1 quartered)
  • 1/4 cup mayonnaise, or to taste
  • 1 small bunch basil leaves, chopped
  • 1/2 cup loosely packed microgreens or arugula
  1. Place the shrimp in a bowl. Rub and toss with 1 tablespoon of the coarse salt. Wash under cold running water. Rub once again with the remaining 1 tablespoon salt, wash well under cold running water, then drain in a colander. Pat dry with paper towels. Season the shrimp generously with the white pepper. Set aside. Combine the shrimp shells and water in a saucepan. Bring to a boil over medium-high heat. Decrease the heat to simmer and let cook until the shells are pink and the broth is fragrant, about 3 minutes. Strain, reserving the broth and discarding the shells. Wipe the saucepan clean.
  2. Return the strained broth to the now-clean saucepan. Add the corn and season with salt and pepper. Bring to a boil over medium-high heat. Decrease the heat to simmer and cook until the corn is tender, about 3 minutes. Drain in a fine-mesh sieve. Place the corn in a medium bowl. Set aside.
  3. Heat the oil in a large skillet over high heat until shimmering. Add the reserved shrimp and cook until pink and opaque, 3 to 5 minutes. Add the shrimp and chopped tomatoes to the corn. Add the lemon zest, lemon juice, mayonnaise, and basil. Stir to combine. Taste and adjust for seasoning with salt and pepper. Divide among chilled plates. Garnish each with microgreens and a wedge of lemon. Serve immediately.

#5.  Spicy New Orleans BBQ Shrimp

Poore Amy

Poore Amy

Ingredients:

2 pounds fresh,jumbo shrimp, peeled and deveined
1/2 cup butter, melted
4 tablespoons Heinz Chili Sauce
3 tablespoons olive oil
2 tablespoons Worcestershire
2 tablespoons fresh lemon juice
1 tablespoon fresh parsley
1 1/2 teaspoons cayenne pepper
1 1/2 teaspoons Liquid Smoke (hickory)
1 teaspoon paprika
1 teaspoon oregano
1/2 teaspoon Tabasco sauce
5 cloves fresh garlic, minced

Directions:

Peel and devein the shrimp.
Add all of the other ingredients in a saucepan, stir and let simmer for 10 minutes.
Remove pan from heat and let cool.
Arrange the shrimp in an oven- proof casserole dish and pour the sauce over the shrimp.
Cover and refrigerate for at least 4 hours, or preferably overnight.
Preheat oven to 400 degrees.
Bake shrimp for 15 – 20 minutes.
Serve immediately with crusty French bread, new potatoes and a crisp salad.

#6.  Shrimp, Tomatillo and Corn Ceviche

shrimp-ceviche-tray-above

Verses From My Kitchen

Ingredients:

  • 2 pounds of medium shrimp
  • 3 tomatillos, husked, washed and cut into 8
  • 2 avocados, halved, pitted and chopped (plus 1)
  • 2 cobs of corn, grilled and corn removed
  • 1/4 cup cilantro, roughly chopped
  • 1 ripe mango, peeled and diced into 1/2″ pieces
  • 4 scallions, trimmed and finely chopped
  • 4 limes, juiced
  • 1 tsp. garlic paste
  • 1 jalapeno pepper, halved, seeded and finely chopped
  • sea salt
  • lime wedges, for serving

Prep:

  1. Using a large mixing bowl, add in the tomatillos, 3 avocados, cilantro, half the lime juice, corn, jalapeno pepper, garlic and salt. Mix well. Cover and chill for at least an hour.
  2. Peel and devein shrimp and cut into thirds. Transfer to a medium bowl. Stir in the remaining lime juice, mango and scallion. Cover and allow to marinate in the fridge for an hour, stirring occasionally.
  3. When ready to serve, add the avocado mixture to the bottom of 6-8 cups and top with the shrimp mixture. Sprinkle a few tomatillo and avocado pieces over top with some additional cilantro. Season and serve.

#7.  Buffalo Shrimp Tostadas

Bev Cooks

Bev Cooks

Ingredients:

* 1 pound extra-large shrimp, thawed and deveined
* 1/2 cup buffalo sauce
* 4 corn tortillas
* 1 cup shredded Monterey Jack cheese
* 1 cup shredded romaine lettuce
* 1/3 cup crumbled blue cheese
* lime wedges, for serving
* cilantro, for garnish

In a large bowl, combine shrimp and buffalo sauce. Let sit in fridge for 15 minutes. The acid in the buffalo sauce will start to cook the shrimp, so don’t let it sit too long.

Heat a large sauté pan over medium-high. Add the shrimp in a single layer and sear on both sides until cooked through, about 3 minutes total. Remove from heat.

In the meantime, preheat your broiler. Place the tortillas on a baking sheet and broil on the BOTTOM rack for about 4 minutes. Flip the tortillas, add the shredded cheddar and broil another 3 to 4 minutes, or until the tortillas have crisped up and the cheese is browned and bubbly. Remove from oven.

Now, all you do is layer. Evenly divide the shredded romaine over the tortillas, followed by 4 or 5 shrimp, the blue cheese crumbles and the cilantro. Spritz with lime juice and serve with the wedges!

#8.  Pan-Seared Shrimp with Sweet Soy-Ginger Glaze

The Washington Post

The Washington Post

Ingredients:

  • 12 ounces extra-large (21-25) peeled and deveined shrimp (defrosted as needed)
  • 1/8 teaspoon kosher or sea salt
  • 1/8 teaspoon freshly ground black pepper
  • 1/8 teaspoon sugar
  • 1 inch fresh ginger root
  • 1 scallion
  • 2 teaspoons canola oil
  • 2 tablespoons sweet soy sauce (kecap manis, available in Asian markets; see headnote)
  • 1 tablespoon water
  • 1 1/2 teaspoons unseasoned rice vinegar
  • Pinch crushed red pepper flakes

Directions:

Pat the shrimp dry with paper towels and place in a mixing bowl. Season them with the salt, pepper and sugar, tossing to coat evenly.

Peel the ginger, then mince it to yield 2 teaspoons. Trim the scallion, then cut the white and light-green parts on the diagonal into very thin slices to yield about 3 tablespoons.

Heat the oil in a large nonstick skillet over medium-high heat until the oil shimmers.

Meanwhile, whisk together the sweet soy sauce, water, ginger, vinegar, scallion and crushed red pepper flakes in a liquid measuring cup.

Add the shrimp to the skillet; stir-fry for 1 to 2 minutes so the shrimp are just cooked through. Add the sauce mixture, tossing to coat. Cook for about 30 seconds, until fragrant.

Divide among individual plates; serve hot.

#9.  Spicy Shrimp

Food 52

Food 52

Ingredients:

  • 1/3 cup Sriracha
  • 1/3 cup olive oil
  • 1 teaspoon Worcestershire Sauce
  • 3 cloves garlic, crushed
  • 1 handful cilantro, roughly chopped, plus more for garnish
  • 1 teaspoon sugar
  • Salt
  • Freshly ground black pepper
  • 2 pounds large shrimp (16 to 20 count), peeled and deveined
  1. Mix together the Sriracha, olive oil, Worcestershire sauce, garlic, cilantro, and sugar. Season aggressively with salt and pepper. Put in a 1-gallon plastic bag, add the shrimp, and mix together in the bag. Marinate in the fridge for 2 to 4 hours. Or longer.
  2. Heat a grill. Skewer the shrimp (4 to 6 shrimp per skewer) and grill until pink and delicious, 2 to 3 minutes per side.
  3. Remove the shrimp from the grill, slide the shrimp from the skewer using a fork, and pile on a serving platter. Sprinkle with finely chopped cilantro, and throw a few toothpicks in a few shrimp. Watch them disappear.

#10.  Rhubarb-Glazed Shrimp

Sunset

Sunset

Ingredients:

  • 1 1/2 cups chopped rhubarb (preferably red rather than green)
  • 1 tablespoon chopped fresh ginger
  • 1 tablespoon chopped garlic
  • 1 tablespoon hoisin sauce
  • 1/4 cup sugar
  • 1 teaspoon reduced-sodium soy sauce
  • 1 pound peeled and deveined medium shrimp (36 to 42 per lb.)
  • 1 green onion, thinly sliced diagonally

Preparation

  1. Heat a grill to high (450° to 550°). In a medium saucepan over medium heat, cook rhubarb, ginger, garlic, hoisin, sugar, and 1/4 cup water. When rhubarb starts to break apart, about 3 minutes, whisk in soy sauce and transfer half the glaze to a small bowl.
  2. Thread shrimp onto 4 metal skewers. Brush both sides of shrimp with glaze from pan. Grill shrimp, turning and basting generously as you go, until they’re opaque and grill marks appear, about 8 minutes total.
  3. Transfer to a serving plate and brush with glaze from bowl. Sprinkle with onion. Serve with remaining glaze from bowl on the side.

How to Make Pasta in One Pot…

Martha Stewart

Martha Stewart

An easy and delicious meal in one pan…perfect for weeknights and last minute entertaining!

Martha Stewart

Martha Stewart

via Martha Stewart

Ingredients

  • 12 ounces linguine
  • 12 ounces cherry or grape tomatoes, halved or quartered if large
  • 1 onion, thinly sliced (about 2 cups)
  • 4 cloves garlic, thinly sliced
  • 1/2 teaspoon red-pepper flakes
  • 2 sprigs basil, plus torn leaves for garnish
  • 2 tablespoons extra-virgin olive oil, plus more for serving
  • Coarse salt and freshly ground pepper
  • 4 1/2 cups water
  • Freshly grated Parmesan cheese, for serving

Directions

  1. Step 1

    Combine pasta, tomatoes, onion, garlic, red-pepper flakes, basil, oil, 2 teaspoons salt, 1/4 teaspoon pepper, and water in a large straight-sided skillet. Bring to a boil over high heat. Boil mixture, stirring and turning pasta frequently with tongs, until pasta is al dente and water has nearly evaporated, about 9 minutes.

  2. Step 2

    Season to taste with salt and pepper, divide among 4 bowls, and garnish with basil. Serve with oil and Parmesan.

10 Color Combinations for a Beautiful Bedroom…

Fabulous Home Blog

Fabulous Home Blog

I love introducing new color combinations into my bedroom – I recently went from greens and yellows to browns and blues and the change is really nice!  There was a time (unfortunately not too long ago) where I thought the more color the better…blue bedspread, green curtains, yellow pillows and a red throw…yeah, that kind of works, right?  (My husband very graciously let me work through that phase in my own time.). What I found though was that focusing in on one or two complimentary colors and adding in neutrals around them really gives the room a polished finish and allows the eyes to rest.

Here are 10 beautiful color combinations to consider for your room!

#1.  Pink and Green

The Suite Life Designs

The Suite Life Designs

#2.  Blue and Orange

Northern Lights

Northern Lights

#3.  Gold and Navy Blue

Style Design Life

Style Design Life

#4.  Purple and Teal

Turn View

Turn View

#5.  Orange and Brown

Coastal Living

Coastal Living

#6.  Greyed Jade and Salmon

Decor Hound

Decor Hound

#7.  Pink and Navy Blue

Sheridan French

Sheridan French

#8.  Brown and Red

Style at Home

Style at Home

#9.  Brown and Pale Blue

Sunday in Bed

Sunday in Bed

#10.  Coral and Taupe

Fabulous Home

Fabulous Home Blog

And here’s mine!

Reclaiming Your Castle

Reclaiming Your Castle

Chicken Bacon & Avocado Chopped Salad…

Gimme Some Oven

Gimme Some Oven

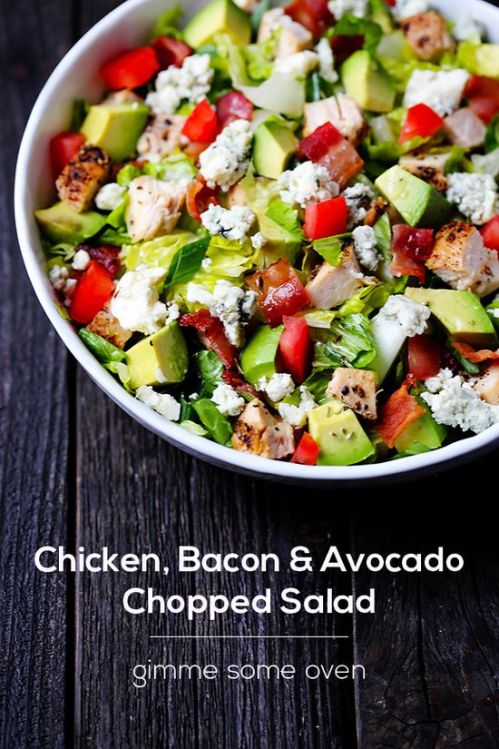
Well, I never got to make the guacamole this weekend ( we decided last minute to take a weekend trip to Atlanta!) but I was thinking about the work week ahead and using the avocado elsewhere…possibly on a homemade Chicken, Bacon & Avocado Chopped Salad.  The recipe yields 4-6 servings so I’ll send one with my husband and pack the rest for myself : )

Gimme Some Oven

Yield: 4-6 Servings

Chicken, Bacon & Avocado Chopped Salad

Ingredients

    • 2 boneless, skinless chicken breasts
    • salt and pepper
    • 1 Tbsp. olive oil
    • 8 cups chopped Romaine lettuce
    • 8 slices bacon, cooked and diced
    • 4 ounces blue cheese, crumbled
    • 2 avocados, pitted and diced
    • 2 roma tomatoes, diced
    • 1/4 cup garlic vinaigrette (see recipe below)
    • 1/4 cup chopped green onions
Garlic Herb Vinaigrette Ingredients:
  • 1/2 cup apple cider vinegar
  • 3 garlic cloves, minced
  • 1 Tbsp. Dijon mustard (optional)
  • pinch of salt and freshly-cracked black pepper
  • 1 Tbsp. dried Italian seasonings
  • 1 1/2 cups extra virgin olive oil

Method

To Make The Salad:

Season chicken breasts on both sides with salt and pepper. Heat oil in a large skillet over medium-high heat and add chicken. Cook for 3 minutes per side, or until the chicken is cooked through and no longer pink inside. (Cooking time wil vary depending on the thickness of the chicken.) Remove chicken and let rest for at least 10 minutes. Dice chicken into small pieces.

Add the diced chicken, lettuce, bacon, blue cheese, avocados and tomatoes to a large bowl, and toss until combined. Drizzle or toss with garlic vinaigrette and serve immediately.

To Make The Vinaigrette:

Whisk all ingredients together until combined.

Recipe inspired by Martinelli’s Little Italy restaurant.

Best Ever Guacamole…

Style Me Pretty

Style Me Pretty

It’s Friday and so inevitably I’m thinking about the weekend…which has led me to think about margaritas…which has now evolved into my stong desire to make and eat guacamole.  Makes perfect sense, right?!?

Maybe not, but I thought I would post this for you anyway.  Have a wonderful weekend!

Style Me Pretty

Style Me Pretty

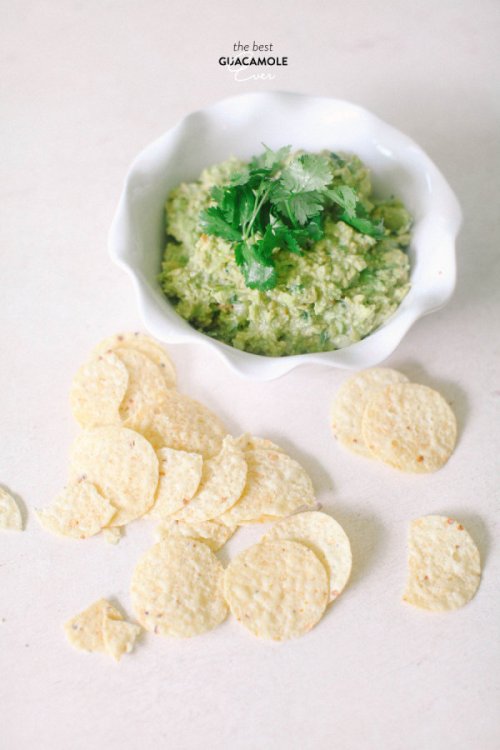
Best Ever Guacamole

via Style Me Pretty

A blend of lime, cilantro, garlic and avocado best served with your favorite tortilla chips or homemade tortillas.

prep time
15 Minute/s
cook time total time
15 Minute/s

Serves 6

Ingredients

  • 3 Ripe Avocados (preferably the black ones)
  • 1 Lime
  • 2 Cloves of Garlic
  • 1 tsp Salt
  • 1 tbs White Onion, minced
  • 2 tbs Cilantro, chopped
  • 1 Tbs Hot Sauce
  • 1 tsp sour cream
  • *optional 1 tsp jalapeno, seeded and minced

Instructions

  1. Begin by mincing your garlic. Pour your salt over your garlic on a wooden chopping block or in a mortar. Smash your garlic with the back of a spoon until a paste forms.
Style Me Pretty

Style Me Pretty

  • Place your avocado, garlic paste, onion and lime juice in a bowl. Mash it with a fork until it reaches the desired texture. We like to leave a few heartier pieces of avocado.
  • Mix in 1/2 of your cilantro, your sour cream, hot sauce and if using, your jalapeno. Stir until well combined.
  • Top with the remaining cilantro and serve with chips and wedges of lime.

Dreaming of the Outer Banks, NC…A Perfect Summer Destination

Style Me Pretty / Elaine Palladino

Style Me Pretty / Elaine Palladino

The Outer Banks, NC are unlike any beach town you’ve ever been too.  Several years ago when my son was still very young I had the good fortune of spending a week there and to this day it’s the most memorable vacation I’ve ever had.  The night of our arrival a large storm front slammed into the coast and shook the windows of our beach house with such force that I was sure they would shatter.  I sat up all night feeling the floor sway under my feet as the stilts holding us up above the sand gave way little by little to the wind.

The following morning we made our way to the beach and what we found was a wall of foam, waist-high – a testament to the power of the storm.  In its wake were thousands of sand dollars and starfish scatter along the shore for miles in every direction.  We spent the rest of that afternoon throwing as many as possible back into the water.

In the evenings we’d wait in anticipation for the dolphins to come in to feed, impossibly close to shore, darting through the waves just before they broke at our feet.  In Corolla, we found our way to a secluded beach and watched as wild horses fed on sea oats and walked freely through the shallow waves – a scene so beautiful I count myself lucky to have seen it in person.

Jared Lloyd Photography

Jared Lloyd Photography

I was reading through some posts this afternoon and came across a photo gallery of the barrier islands taken by Elaine Palladino for Style Me Pretty; it instantly reminded me how much I want to go back.  There’s something magical about this place – if you ever have the chance to go, you should.

Style Me Pretty / Elaine Palladino

Style Me Pretty / Elaine Palladino

Style Me Pretty / Elaine Palladino

Style Me Pretty / Elaine Palladino

Style Me Pretty / Elaine Palladino

Style Me Pretty / Elaine Palladino

Style Me Pretty / Elaine Palladino

Style Me Pretty / Elaine Palladino

Style Me Pretty / Elaine Palladino

Style Me Pretty / Elaine Palladino

Style Me Pretty / Elaine Palladino

Style Me Pretty / Elaine Palladino

Style Me Pretty / Elaine Palladino

Style Me Pretty / Elaine Palladino

Style Me Pretty / Elaine Palladino

Style Me Pretty / Elaine Palladino

Style Me Pretty / Elaine Palladino

Style Me Pretty / Elaine Palladino

Style Me Pretty / Elaine Palladino

Style Me Pretty / Elaine Palladino

Style Me Pretty / Elaine Palladino

Style Me Pretty / Elaine Palladino

Pepperoni Pizza Monkey Bread…Fun to Make and Eat!

Confections of a Foodie Bride

Confections of a Foodie Bride

My daughter is 4 and she wants to do whatever her mommy does.  In the morning she sits next to me on the bathroom counter while I’m putting on my makeup;  if I’m wearing a skirt she’s wearing a skirt.  Most nights while I’m trying to sing her to sleep, instead of drifting off quietly she’s belting out tunes right along with me – like a concert instead of bedtime. But what she loves to do more than anything else is to help her mom in kitchen…which is why I love this recipe!  Fun to make and fun to eat!

via Confections of a Foodie Bride

Pepperoni Pizza Monkey Bread

You can take the long route and make your favorite pizza dough and marinara sauce, or the short route and pick up your favorite pizza dough and red sauce from the store.

Confections of a Foodie Bride

Confections of a Foodie Bride

Confections of a Foodie Bride

Confections of a Foodie Bride

Confections of a Foodie Bride

Confections of a Foodie Bride

Ingredients

  • 2 cloves garlic, thinly sliced
  • 4 Tbsp butter
  • 2 lbs pizza dough (I used this recipe because it makes enough for two pizza)
  • 6 oz mozzarella cheese, cut into small cubes (you’ll need ~48 pieces)
  • 48 slices of Turkey pepperoni (from 1 package)
  • 2-3 cups marinara sauce, warmed, for serving

Instructions

  1. Heat garlic and butter over medium heat just until the garlic begins to brown. Remove from heat and let sit.
  2. Lightly brush the inside of a bundt pan (or other oven-safe dish) with garlic butter.
  3. Pull off large marble-sized balls of dough and flatten (~2/3 of an ounce, a kitchen scale makes this very easy). Top with a slice of pepperoni and a cube of mozzarella.
  4. Wrap the dough around the pepperoni and cheese, pinching well to seal.
  5. Very lightly brush the pizza ball with garlic butter and place into the bundt pan (I dabbed the pizza balls on a butter-dipped silicon brush to keep butter use low – there will be 1+ Tbsp leftover – and my hands butter free. Buttery hands make it hard to get the pizza balls to seal).
  6. Repeat until all of the dough is used.
  7. Cover and let sit for 30 minutes, while preheating the oven to 400.
  8. Bake for ~35 minutes, until the top is very brown.
  9. Remove from the oven and let sit for 10 minutes.
  10. Turn out onto a platter and serve with warmed marinara sauce for dipping

In writing this blog, one of my favorite posts has been about using mason jars in the kitchen…for food…imagine that! This weekend I’ll be making the Cupcakes in a Jar so I thought I would share this with you again. Enjoy!

RECLAIMING YOUR CASTLE

Is there anything that we haven’t done to the mason jar?  Paint it, illuminate it, fill it with buttons and hang it from the bottom of our cabinets.  I can’t really point the finger – I recently bought a $7 bag of coffee beans just so I could dump it into a mason jar and top it off with a tea light.

These handy little jars used to have a purpose, though – my grandmother used them to store homemade apple butter (and a fly one Christmas…which also happened to be the last Christmas I ate apple butter).  But I love the idea of using them for serving food; it’s practical and trendy and after all, that’s what they were made for…I think!  Pinterest might prove me wrong there.

So, here are 5 Classically Cool Ways to Use Mason Jars in the Kitchen…

#1.  Cupcake in a Jar

This idea…

View original post 321 more words

10 Fabulous Summertime No-Bake Desserts…

Martha Stewart

Martha Stewart

It’s summertime and with the warmer weather and longer summer days come picnics and family get-togethers, church functions and your kid’s friends running wildly through the house and emptying out your pantry.  So, be prepared and pin this post for 10 No-Bake Summer Desserts that will minimize your time in the kitchen and maximize your waistline.  Just kidding.

#1.  Waffle-and-Strawberry Trifle

via Martha Stewart

Ingredients

  • 1/3 cup plus 3/4 cup sugar
  • 3 tablespoons cornstarch
  • 1/8 teaspoon fine salt
  • 1 1/2 cups whole milk
  • 2 cups heavy cream
  • 2 large egg yolks
  • 2 tablespoons unsalted butter
  • 1 teaspoon pure vanilla extract
  • 2 pounds strawberries, hulled and cut into 1/4-inch slices
  • 8 ounces frozen Belgian waffles, toasted and cut into 1 1/2-inch pieces
Taste and Tell

Taste and Tell

Directions

  1. Place a fine-mesh sieve over a medium heatproof bowl. In a medium saucepan, whisk together 1/3 cup sugar, cornstarch, salt, milk, 1/2 cup cream, and egg yolks. Cook over medium-high, whisking constantly, until thickened and bubbling, 6 minutes. Reduce heat to medium-low and cook, whisking, 1 minute. Pour through sieve into bowl. Stir in butter and vanilla until combined. Press plastic wrap against surface of pudding to prevent a skin from forming and refrigerate 3 hours (or up to 3 days).
  2. Toss strawberries with 1/2 cup sugar; let sit until fruit has released some juice, 20 minutes. Using an electric mixer, beat 1 1/2 cups cream and 1/4 cup sugar on medium-high until stiff peaks form, about 2 minutes.
  3. In a large bowl or trifle dish, layer 1/2 the waffles, strawberries, pudding, and whipped cream; repeat. Cover trifle with plastic wrap and refrigerate at least 2 hours (or up to 1 day).

Cook’s Note

Shopping Tip
Any type of frozen waffle will work in the trifle; we like Belgian ones for their large nooks and crisp texture.

#2.  Pina~Colada Dip

ValSoCal

ValSoCal

via ValSoCal

Ingredients

1 package ( 8 ounce ) cream cheese, softened
1 jar ( 7 ounce ) marshmallow creme
1 can ( 8 ounce ) crushed pineapple, drained
1/2 cup flaked coconut
1 pound cake or angel food cake, cubed
strawberries
fresh pineapple, cubed

wikiHow

wikiHow

Directions

1) In a small bowl, beat cream cheese and marshmallow creme until fluffy.
Fold in pineapple and coconut. Cover and chill until serving. Serve.

#3.  Frozen Chocolate-Mousse Trifle

Martha Stewart

Martha Stewart

via Martha Stewart

Ingredients

  • 2 cups crumbled chocolate angel-food cake (5 ounces)
  • 1 tablespoon brandy (optional)
  • 4 large egg whites
  • 1/2 cup sugar
  • 1/3 cup unsweetened cocoa powder, sifted
  • 1/2 cup cold heavy cream
  • 1/2 ounce bittersweet chocolate
Benefit Your Life

Benefit Your Life

Directions

  1. In a medium bowl, toss together cake and brandy, if desired. In another medium bowl, using an electric mixer, beat egg whites on high until foamy. With mixer on medium, gradually add sugar. Increase speed to high and beat until stiff, glossy peaks form, 2 minutes. With a rubber spatula, gently fold cocoa powder into egg white mixture.
  2. In another medium bowl, beat cream on high until stiff peaks form, 3 minutes. Gently fold whipped cream into egg white mixture.
  3. Fill each of four small glasses with 1/4 cup cake and top with heaping 1/4 cup mousse. Repeat to make a second layer with remaining cake and mousse. Freeze until firm, 3 hours (or up to overnight). Let sit 10 minutes at room temperature, then finely grate chocolate over tops to serve.

#4.  Peanut Butter Tart

Martha Stewart

Martha Stewart

via Martha Stewart

Ingredients

  • For the Crust

    • Ten 4 3/4-by-2 1/2-inch graham crackers, broken into pieces
  • For the Filling

    • 6 tablespoons unsalted butter, melted
    • 3 ounces best-quality milk chocolate, plus more for curls
    • 1 3/4 cups heavy cream
    • 3/4 cup creamy peanut butter
    • 1/2 cup cream cheese (4 ounces)
    • 1/3 cup sweetened condensed milk
    The Cheap Gourmet

    The Cheap Gourmet

    Directions

    1. Place graham crackers in the bowl of a food processor, and pulse until fine crumbs are formed. Transfer to a medium bowl, and add butter. Stir with a fork until thoroughly combined. Place crumbs in a 13 3/4-by-4 1/4-inch rectangular tart pan with a removable bottom. Press crumbs up the sides of the pan to form the edge of the tart and then evenly over the bottom of the pan. Place in the refrigerator while making the filling.
    2. Fill a large bowl with ice and water. Finely chop chocolate, and place in a medium bowl. Place 1/2 cup cream in a small saucepan over medium heat, and bring to a boil. Pour over chopped chocolate, and set aside for 5 minutes to yield chocolate ganache. Whisk to combine. Set in ice bath until ganache is cool, whisking constantly. Once cool, remove from ice bath, and whisk until ganache is just thick enough to hold its shape; do not overbeat. Spread in the bottom of the prepared crust, and return to the refrigerator until set.
    3. Combine peanut butter, cream cheese, and sweetened condensed milk in the bowl of a food processor; process until smooth. Transfer to a mixing bowl.
    4. Whip 3/4 cup heavy cream to soft peaks. Add whipped cream to peanut butter mixture; whisk to combine.
    5. Spoon mixture into prepared crust; return to the refrigerator for 2 hours or overnight. Remove tart from refrigerator, and transfer to a serving platter 10 minutes before serving. Whip remaining 1/2 cup cream. Top tart with dollops of whipped cream. Use a vegetable peeler to make chocolate curls for garnish.

    #5.  Blueberry-Orange Parfaits

    My.Recipes

    My.Recipes

    via my.recipes

    Ingredients

    • 1 1/2 tablespoons Demerara or turbinado sugar
    • 1/2 teaspoon grated orange rind
    • 2 (7-ounce) containers reduced-fat plain Greek-style yogurt $
    • 2 cups fresh blueberries $
    • 2 cups orange sections (about 2 large)
    • 1/4 cup wheat germ
    Meatless Monday

    Meatless Monday

    Preparation

    1. 1. Combine first 3 ingredients in a small bowl, stirring until blended. Spoon 1/4 cup blueberries into each of 4 tall glasses. Spoon about 2 1/2 tablespoons yogurt mixture over blueberries in each glass. Add 1/4 cup orange to each serving. Repeat layers with remaining blueberries, yogurt mixture, and orange. Sprinkle 1 tablespoon wheat germ over each serving; serve immediately.

    #6.  Chocolate-Mint Icebox Cake

    Martha Stewart

    Martha Stewart

    via Martha Stewart

    Ingredients

    • 1 3/4 cups heavy cream, chilled
    • 1/4 cup sugar
    • 3/4 teaspoon mint extract
    • 1 package (9 ounces) chocolate wafers
    • 1 cup miniature chocolate chips
    Foodily

    Foodily

    Directions

    1. Make the mint cream: With an electric mixer, beat heavy cream, sugar, and mint extract until stiff peaks form.
    2. Line a serving platter with two sheets of wax paper side by side. Assemble the cake: Spread each wafer with about 1/2 tablespoon mint cream, forming stacks. Lay stacks horizontally along seam of paper, pressing gently to form a log. With small spatula or knife, cover log with remaining mint cream. Refrigerate at least 4 hours or up to 2 days.
    3. To serve, gently remove wax paper from underneath cake (holding cake in place with a metal spatula, if necessary), and sprinkle with chocolate chips. Slice cake diagonally with a serrated knife.

    #7.  Pineapple No-Bake Cheesecake

    My Baking Addiction

    My Baking Addiction

    via My Baking Addiction

    Ingredients

    For the Crust

    3/4 cup graham cracker crumbs
    1 tablespoon granulated sugar
    2 tablespoons unsalted butter, melted

    For the Filling

    1 (8 ounce) package cream cheese, softened
    3 tablespoons granulated sugar (see note below)
    12 ounces fresh pineapple, pureed
    1/2 teaspoon pure vanilla extract
    1 (8 ounce) tub frozen whipped topping, thawed

    For the Garnish

    whipped topping, optional
    fresh pineapple, optional

    Blog Her

    Blog Her

    Directions:

    1. In a medium bowl, stir together the graham cracker crumbs, sugar and melted butter. Evenly divide the crumbs between your individual serving dishes and press into the bottoms of the dishes to form a crust layer.

    2. In a large bowl, with an electric mixer, beat the cream cheese and sugar on medium-high speed until smooth and creamy, about 3 minutes. Add in pineapple and vanilla and mix to combine, scraping down the sides of the bowl as needed. Using a rubber spatula, fold in the whipped topping until well combined.

    3. Evenly pipe or spoon the filling into prepared individual serving dishes. Cover with plastic wrap and refrigerate for at least 3 hours before serving.

    4. If desired, garnish with additional whipped topping and fresh pineapple.

    #8.  Chocolate, Banana and Graham Cracker Ice Box Cake

    Martha Stewart

    Martha Stewart

    Ingredients

    • 15 ounces milk chocolate, chopped
    • 5 large egg yolks
    • Salt
    • 3 cups heavy cream
    • 20 graham cracker sheets
    • 4 or 5 ripe bananas, very thinly sliced lengthwise
    • Garnish: whipped cream
    theKitchn

    theKitchn

    Directions

    1. Line a 5-by-10-inch loaf pan with plastic wrap. Place chocolate in a heatproof bowl. Place yolks and a pinch of salt in another heatproof bowl.
    2. Bring cream to a simmer in a medium saucepan. Slowly pour cream into bowl with yolks, whisking constantly; return mixture to saucepan set over low heat. Cook, stirring constantly, until mixture is thick enough to coat the back of a wooden spoon, about 8 minutes (mixture should not come to a boil). Immediately strain through a fine sieve set over chocolate; stir until chocolate melts and is smooth. Refrigerate, stirring occasionally, until thick, about 4 hours.
    3. Spread 1 cup chocolate mixture evenly into bottom of loaf pan. Top with a layer of 4 graham crackers, trimmed to fit. Spread 1/2 cup chocolate over tops, and cover with some bananas. Spread 1/2 cup chocolate over bananas, and top with a layer of 4 trimmed graham crackers. Repeat with remaining chocolate, bananas, and graham crackers until you reach the top of the pan; finish with graham crackers.
    4. Cover with plastic wrap, and refrigerate overnight. Uncover, and turn out onto a serving platter. Remove plastic wrap. Garnish with whipped cream, and cut into slices.

    Cook’s Note

    Unmolded icebox cake can be refrigerated for up to 2 days.

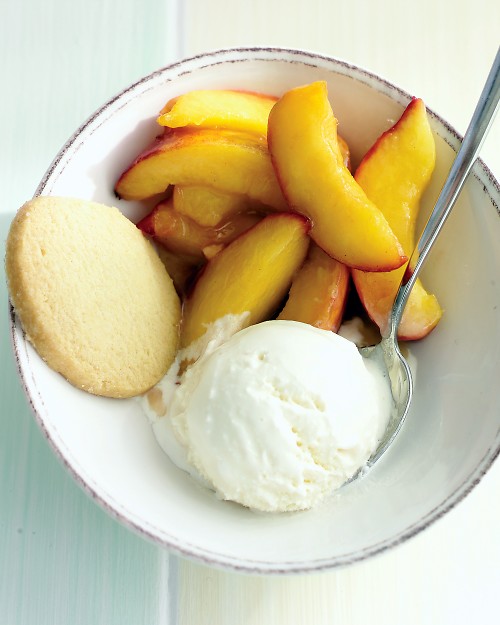
    #9.  Sauteed Peaches

    Martha Stewart

    Martha Stewart

    via Martha Stewart

    Ingredients

    • 2 tablespoons unsalted butter
    • 2 tablespoons sugar
    • 4 large ripe peaches, pitted and each cut into 8 wedges
    Fifer Orchards

    Fifer Orchards

    Directions

    1. In a large skillet, melt unsalted butter over medium heat. Stir in sugar.
    2. Add peaches. Cook, stirring, until sugar has dissolved and peaches are warmed through and coated, 2 to 5 minutes. Serve immediately.

    #10.  No-Bake Cherry Cheesecake

    Martha Stewart

    Martha Stewart

    via Martha Stewart

    Ingredients

    • FOR THE CRUST

      • Vegetable oil cooking spray, for pan
      • 1 1/3 cups vanilla wafer or shortbread cookies, finely ground (6 ounces)
      • 2 tablespoons unsalted butter, melted
      • 2 tablespoons sugar
      • 1/8 teaspoon ground cinnamon
      • Salt
      • FOR THE FILLING

        • 1 cup sour cream, room temperature
        • 2/3 cup sugar
        • 4 ounces mascarpone cheese (1/2 cup), room temperature
        • 4 ounces cream cheese (1/2 cup), room temperature
        • 2 ounces soft fresh goat cheese (1/4 cup), room temperature
        • 1 vanilla bean, split and scraped, pod reserved for another use (or 3/4 teaspoon pure vanilla extract)
        • 1/4 teaspoon finely grated lemon zest
        • 1 cup heavy cream
      • FOR THE TOPPING

        • 1 pound sweet cherries, halved and pitted (3 cups)
        • 1/3 cup sugar
        • 2 teaspoons balsamic vinegar
        • 1/2 cinnamon stick
        • 1 tablespoon cornstarch
        • 1 tablespoon water
        my judy the foody

        my judy the foodie

        Directions

        1. Make the crust: Coat a 9-inch springform pan with cooking spray; line bottom with a round of parchment. Stir together cookies, butter, sugar, ground cinnamon, and a pinch of salt; press evenly into bottom of pan. Refrigerate while making filling.
        2. Make the filling: Beat sour cream, 1/3 cup sugar, the cheeses, vanilla seeds or extract, and lemon zest with a mixer on medium speed until very smooth, about 4 minutes. Pass mixture through a fine sieve into a large bowl. Whisk heavy cream and remaining 1/3 cup sugar until medium peaks form; fold into filling mixture, and spread evenly onto crust. Smooth top, and freeze until firm, at least 2 hours. Refrigerate for 45 minutes before serving.
        3. Make the topping: Bring half the cherries, and the sugar, vinegar, and cinnamon stick to a simmer in a small saucepan. Cook, covered, for 5 minutes. Uncover, and simmer until cherries are soft, about 3 minutes. Whisk together cornstarch and water; add to cherry mixture. Simmer for 1 minute. Remove from heat, and stir in remaining cherries. Refrigerate until ready to use.
        4. Run a knife around edge of cake; release sides to remove from pan, and transfer cake to a serving platter. Remove cinnamon stick from topping; spoon over cake.

        Cook’s Note

        Serving idea: Drizzle slices with extra balsamic vinegar, and sprinkle with freshly ground pepper.