Sara Silver's avatar

Lemony White Bean Dip…Food52 Love Pt. 4

Food52

Food52

Hummus is an all around great snack; perfect for dips and uber healthy…but if you’re looking for an alternative, according to Food52 you can’t do better this Spring than Lemony White Bean Dip.  The mild tast of the white beans allows the seasonal herbs you’ll be adding to the mix really shine through; I can’t wait to try this one!

Food52

Food52

Garlic, rosemary, parsley, lemon and thyme are just a start for this versatile dip.  Experiment with red pepper for some added heat or try using fresh dill as the author suggests.  Follow the picture links for the full story on Hummus’ Spunky Sister!

White Bean Dip with Fresh Herbs

Serves 4

  • 2 cups cooked white beans
  • 1 clove garlic, minced
  • 4 tablespoons extra-virgin olive oil, divided into 1 tablespoon and 3 tablespoons
  • 1 tablespoon chopped fresh rosemary
  • 2 teaspoons fresh thyme
  • 1 teaspoon sea salt (or to taste)
  • Black pepper, to taste
  • 2 tablespoons fresh lemon juice
  • 3 tablespoons fresh parsley
  1. In a medium-sized pan, heat the garlic in 1 tablespoon olive oil. Cook for two minutes, and then add the white beans, rosemary, and thyme. Sautee for another 4 to 5 minutes, or until garlic is soft and fragrant.
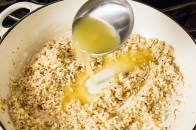
  2. Transfer the beans to a food processor. Add the salt, pepper, lemon, and remaining olive oil. Process on high, stopping every now and then to scrape the bowl down, until mixture is totally creamy and smooth.
  3. Pulse in the fresh parsley. Serve with an extra drizzle of olive oil.
Sara Silver's avatar

Top 5 Favorite Photo Food Blogs…


What Katie Ate

What Katie Ate

Face it, it’s hard to come up with things to make for dinner every night!  We try to be creative but so many times in the end it’s the box of Kraft mac and cheese and cut up hot dogs that make their way to the stove top.  Well, I’m a visual learner and there’s no better way to get inspired to cook than looking at a photo of a beautifully put together meal and thinking…”hey, I can do that!”

So, without further adieu here are my Top 5 Favorite Photo Food Blogs (say that 5 times fast).

#1.  What Katie Ate

What Katie Ate

What Katie Ate

What Katie Ate

What Katie Ate

Even if I hated cooking I would still read this blog; the photography is incredible.  What Katie Ate offers a wide array of recipe options that include meat and gluten-free meal alternatives.  Must check this one out!

#2.  Verses From My Kitchen

Verses From My Kitchen

Verses From My Kitchen

bean-soup-2-above

Verses From My Kitchen

This guy loves to cook…and drink.  He’s as much a writer as he is a food lover; his stories are engaging and fun to read and the photos are inspiring.  Verses From My Kitchen makes you feel as though you have a friend cooking right along with you.

#3.  Hungry Girl por Vida

Hungry Girl por Vida

Hungry Girl por Vida

Hungry Girl por Vida

Hungry Girl por Vida

Food, photos, makeup tips, milk shakes…this food photo blog is for the ladies and I love it.  Get food inspired and find a new concealer all at the same time!  Cannot think of a better combination.

#4.  What Should I Eat for Breakfast Today

What Should I Eat for Breakfast Today

What Should I Eat for Breakfast Today

What Should I Eat for Breakfast Today

What Should I Eat for Breakfast Today

Have you ever asked yourself that question?  Well, this blog has all the early morning answers!  From Fried Pears to Polish Pancakes this beautiful food blog gives scrambled eggs a run for their money with exciting alternatives to the breakfast norms. 

#5.  theKitchn

theKitchn

theKitchn

theKitchn

theKitchn

A branch of Apartment Therapy, theKitchn is more than just a place to find photo inspiration and recipes.  They’ve got tips for serving large groups and picky eaters and how to’s for presenting your meals with style.  Photo and food fabulous!

Sara Silver's avatar

Smoky Jalapeno Grilled Cheese With Tomatillos…Food Republic

Food Republic

Food Republic

I’ve said it before and I really mean it…one of my favorite things about writing this blog is all of the new inspiration I’ve found for DIY projects around the house, tips and tricks for updating our living space and food!  I’ve stumbled across some of the most amazing online publications and blogs about food that I never knew existed.  I did a post on risotto from Food 52 that I used for Easter dinner and it was amazing; something I never would have tried had I not discovered it here.

In any case, another incredible food site is Food Republic and this is a recipe for Grilled Cheese…all grown up style!  Get the kids to bed early tonight and “Treat Yo’ Self!” (if you’re a fan of Parks and Recs with Amy Poehler you’ll appreciate that reference) 🙂

Food & Wine Suggested Pairing for Grilled Cheese:  Riesling

Ingredients

1 fresh jalapeno, stem and seeds discarded, minced
1 tablespoon fresh cilantro, finely chopped
1/2 teaspoon brown sugar
juice of one lime
1 fresh tomatillo, thinly sliced
1 1/2 ounces mild cheddar, grated
1 1/2 ounces smoked gouda, grated
1 ounce Gruyere, grated
2 slices crusty white bread
2 tablespoons butter
 
Directions: 
  1. Combine jalapeño, lime juice, cilantro and brown sugar. Mix thoroughly and set aside for at least ten minutes.
  2. Using the palms of your hands, lightly press the tomatillo slices between two paper towels to draw out the excess liquid. Set aside.
  3. Sprinkle the cheddar on one of the white bread slices. Drain the jalapenos and cilantro, reserving the lime juice. Sprinkle the jalapeños and cilantro on top of the cheddar cheese. Add the gruyere, followed by the gouda, followed by the tomatillo slices. Put the second slice of bread on top and microwave for twenty seconds to pre-melt the cheese.
  4. Meanwhile, melt one tablespoon butter in skillet over medium heat.  Place the sandwich in the middle of the butter and press on top with a spatula. When the sandwich is flattened, use the spatula (or a butter knife, if you prefer) to spread the remaining butter on top of the sandwich. 
  5. When the bottom half turns a golden color, flip the sandwich. Press down again with the spatula, and fry until the other half is golden brown and the cheese is melted. If necessary, flip the sandwich again to keep it from burning.
  6. Transfer to a plate and cut in quarters. Brush with the reserved lime juice, or set aside for dipping and serve.
Sara Silver's avatar

Roasted Vegetables In 4 Steps…Food 52 Love Pt. 2

Current Food 52 ‘Not Recipe’

How to Roast Any Vegetable in 4 Steps

Food 52

Food 52

Cut Your Veggies and Pat Them Dry

Food 52

Food 52

Drizzle with Olive Oil, Seasonings of Your Choice and Salt.  Coat Each Piece Thoroughly

Food 52

. Food 52

Throw Your Veggies on Parchment Paper.  Set Your Oven to Somewhere Between 400 – 450 Degrees.  Flip Halfway Through Cooking.

Food 52

Food 52

According to Food 52, Roasted Perfection is Indicated By a Crispy Outside and a Soft Inside; about 45 Minutes for Root Vegetables at 400 degrees.

8569896076_0b956c4838_z

Food 52

Food 52

Sara Silver's avatar

3 Course Spring Meal…

I’ve been in Spring mode all day today.  I did a post on Easter decorating, Spring florals and I thought I would round things out by doing a Spring meal.  From hors d’oeuvre to the main course to dessert, according to Food & Wine online these are some of the best Spring recipes available.  As soon as I kick this cold I plan on trying them all out!  Follow the picture links for many more tasty Spring recipes.

Hor D’Oeuvre:  Cherry Tomato Tart With Basil

Food & Wine

Food & Wine

  1. 1 1/2 cups all-purpose flour
  2. Salt
  3. 7 tablespoons cold unsalted butter, cubed
  4. 1/2 cup cold heavy cream
  5. 2 pints cherry or grape tomatoes
  6. 2 tablespoons shredded basil leaves
  1. Butter a 9-inch tart pan with a removable bottom. In a food processor, pulse the flour with a pinch of salt and the butter until the mixture resembles coarse meal. Add the cream and pulse until the dough nearly comes together. Turn the dough out onto a floured work surface and knead a few times. Cover and refrigerate for at least 30 minutes or overnight.
  2. Preheat the oven to 325°. Roll out the dough to a 14-inch round. Press the round into the tart pan; trim off any excess. Mound the tomatoes in the shell. Bake for about 1 hour and 40 minutes, until the dough is evenly browned. Let cool. Season with salt, garnish with the basil and serve.

Main Course:  Beer-Braised Chicken Stew with Fava Beans and Peas

Food & Wine

Food & Wine

*Braise chicken thighs in beer before adding to the stew

  1. 1/2 teaspoon cayenne pepper
  2. 1/4 cup fresh lemon juice
  3. 1/2 cup plus 2 tablespoons pure olive oil
  4. 8 skinless chicken thighs
  5. 2 tablespoons anise seeds
  6. 4 garlic cloves, coarsely chopped
  7. 1/2 teaspoon loosely packed saffron threads
  8. 2 teaspoons sweet paprika
  9. Salt
  10. 1 cup shelled fava beans
  11. 1/2 cup fresh peas, preferably English peas
  12. Freshly ground black pepper
  13. 2 tablespoons unsalted butter
  14. 1 pound button mushrooms, halved
  15. 8 scallions, thinly sliced
  16. 2 thyme sprigs
  17. 1 tablespoon all-purpose flour
  18. One 12-ounce bottle Belgian beer
  19. 1/2 cup heavy cream
  20. 1/4 cup coarsely chopped flat-leaf parsley
  1. In a small skillet, toast the anise seeds over moderate heat, shaking the skillet, until fragrant, about 3 minutes. Let the anise seeds cool slightly, then crush with the side of a knife.
  2. In a mini food processor, combine the toasted anise seeds with the chopped garlic, saffron, paprika and cayenne. Add the lemon juice and puree. Transfer the mixture to a large, shallow bowl and stir in 1/2 cup of the olive oil. Add the chicken thighs and turn to coat with the marinade. Refrigerate for 1 hour.
  3. Meanwhile, bring a medium saucepan of water to a boil. Add salt and the fava beans and cook for 1 minute; using a slotted spoon, transfer the fava beans to a small bowl and let cool slightly. Add the peas to the boiling water and cook until tender, 5 to 6 minutes; drain. Peel the fava beans and add to the peas.
  4. Heat the remaining 2 tablespoons of olive oil in a large enameled cast-iron casserole. Remove the chicken thighs from the marinade, scraping off the excess. Season the chicken with salt and black pepper and cook over moderately high heat, turning occasionally, until browned, about 10 minutes. Transfer the chicken thighs to a platter.
  5. Wipe out the casserole, add the butter and heat until melted. Add the halved mushrooms, sliced scallions and thyme and cook over moderate heat, stirring occasionally, until any liquid has evaporated and the mushrooms are browned, about 8 minutes. Sprinkle the flour over the mushrooms and cook, stirring, for 1 minute. Slowly stir in the beer and bring to a boil, scraping up any browned bits on the bottom of the casserole.
  6. Return the chicken thighs to the casserole and season with salt and black pepper. Cover and simmer over low heat until the chicken is tender and cooked through, about 25 minutes. Add the cream, fava beans and peas, increase the heat to moderate and cook uncovered until the sauce has reduced slightly, about 5 minutes. Discard the thyme sprigs. Serve the chicken stew in shallow soup bowls, sprinkled with the parsley.
Dessert:  Cherries Poached in Red Wine with Mascarpone Cream
Food & Wine

Food & Wine

  1. 2 1/4 cups red wine
  2. 1 cup sugar
  3. 1 1-by-3-inch strip orange zest
  4. 2 pounds sweet cherries, halved and pitted
  5. 1 cup mascarpone cheese
  6. 2 1/2 tablespoons honey
  1. In a medium stainless-steel saucepan, combine the wine, sugar, and orange zest. Bring to a simmer over moderately high heat. Add the cherries and bring back to a simmer. Reduce the heat and simmer, partially covered, until the cherries are just tender, about 5 minutes. Pour into a glass or stainless-steel bowl so the cherries don’t overcook.
  2. In a small bowl, combine the mascarpone with the honey. Remove the strip of orange zest from the cherries. Serve the warm cherries and syrup in bowls or stemmed glasses, topped with a large dollop of the mascarpone cream.
Variations• The warm cherries and poaching liquid are great alone—without the mascarpone cream—or with whipped cream.• Serve the mascarpone cream with cut up fresh fruit or mixed berries instead of with the poached cherries.
Sara Silver's avatar

Food and Wine Pairing Infographic…

Food Republic

Food Republic

I must be hungry; I am in a food mood at the moment and even if I weren’t this infographic just really deserved a post of its own.  How helpful is this?!?

Ok, must stop blogging and start cooking…after I print this out.

Sara Silver's avatar

Food52…New Favorite Food Site!

Food52

Food52

So, my husband introduced me to an online food publication called Food52.  It’s an amazing resource for anyone who can cook and offers very practical and helpful info for those of us that really want to cook but may be slightly dysfunctional in the kitchen.  Some of their go-to topics:  20-Dollar, 20-Minute Meals, Dinner vs. Child, Sunday Dinners and Kitchen Confidence with tutorials on ‘The Best Way to Boil an Egg’ and ‘How to Know When Chicken is Done.’  The photographs that accompany each feature are a reason to visit the site all by themselves; they are a reminder that cooking and presenting food correctly is truly a work of art.

The picture above is from a section called ‘Not Recipes’ and the topic is ‘How to Make Any Risotto in 5 Steps,’ with whatever you have handy around the house.  I’ve never made Risotto but after reading this I really want to!

Food52

Food52

Food52

Food52

Food52

Food52

To end this post on a sweet note, how about ‘Homemade Cadbury Creme Eggs,’ submitted to the site by some wonderful person who has now given me the resources to make and eat an embarrassing amount of these this Spring in the privacy of my own home.  Check it out!

Homemade Cadbury Creme Eggs

Makes around 15 eggs, depending on size.

Via the instructables.com

½ cup Lyle’s golden syrup
6 tablespoons butter, softened
½ teaspoon salt
3 drops orange blossom water (optional)
1 vanilla bean, seeds removed (optional)
1 teaspoon vanilla
3 cup powdered sugar
¼ to ½ teaspoon yellow food coloring
12 ounces dark chocolate, chopped (or 1 bag bittersweet chocolate chips)

Food52

Food52

Food52

Food52

Food52

Food52

See what I mean about the pictures; they make you want to cook!

In summation, awesome site…worth adding to your short list.

Sara Silver's avatar

Dinner Tomorrow Night?

The Girl Who Ate Everything

The Girl Who Ate Everything

The Girl Who Ate Everything

The Girl Who Ate Everything

How easy is this?!?  Served with a salad this would make an easy Monday night meal and I’m pretty sure not a child on earth would turn it down.

Ingredients

    • 1 (8 ounce) package refrigerated crescent roll dough
    • 4 cheese sticks, halved
    • 1 (3.5 ounce) package sliced pepperoni
    • optional – marinara or ranch sauce for dipping
Garlic Butter Glaze:
  • 2 tablespoons butter, melted
  • 1/2 teaspoon Italian seasonings
  • 1/4 teaspoon garlic powder
  • 1 Tablespoon grated Parmesan cheese

Instructions

  1. Preheat oven to 350 degrees.
  2. Take each triangle of crencent roll dough and place about 6 pepperoni on the bottom of the triangle. Place half of a cheese stick on top and roll up. Place seam side down on a cookie sheet and bake for 10-14 minutes or until golden brown.
  3. While rolls are cooking, combine the melted butter, Italian seasonings, garlic powder and Parmesan cheese in a small bowl.
  4. When rolls are done remove from the oven and brush with the garlic butter glaze. Serve with marinara or ranch for dipping.

http://dinnerwiththedonnells.blogspot.com/2011/07/pepperoni-roll-ups.html

Have A Good Week!